Category: RECIPES

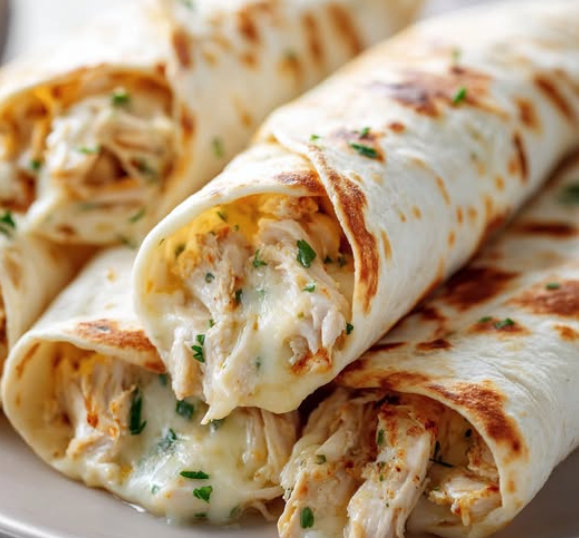
  • Ranch Chicken Burritos

    Ranch Chicken Burritos

    (Creamy Ranch Chicken, Cheese & Flavor-Packed Burritos Wrapped in a Warm Tortilla)

    These Ranch Chicken Burritos are the ultimate comfort food filled with juicy seasoned chicken, creamy ranch flavor, melted cheese, rice, and delicious toppings all wrapped inside a warm flour tortilla.

    They are easy to make, perfect for busy weeknight dinners, meal prep, or when youโ€™re craving a cheesy, satisfying burrito packed with flavor.


    Full Recipe (Ingredients + Instructions)

    Ingredients

    For the Ranch Chicken Filling:

    • 2 pounds boneless skinless chicken breasts or thighs
    • 2 tablespoons olive oil
    • 1ยฝ teaspoons ranch seasoning mix
    • 1 teaspoon garlic powder
    • 1 teaspoon onion powder
    • 1 teaspoon smoked paprika
    • ยฝ teaspoon chili powder
    • ยฝ teaspoon black pepper
    • 1 teaspoon salt
    • Juice of 1 lime

    For the Burritos:

    • 8โ€“10 large flour tortillas
    • 2 cups cooked Mexican rice or white rice
    • 2 cups shredded cheddar cheese
    • 1ยฝ cups Monterey Jack cheese
    • 1 cup black beans, drained and rinsed
    • 1 cup corn kernels
    • ยฝ cup sour cream
    • ยฝ cup ranch dressing
    • Fresh cilantro

    Optional Additions:

    • Crispy bacon pieces
    • Avocado slices
    • Jalapeรฑos
    • Pico de gallo
    • Lettuce
    • Salsa verde
    • Hot sauce

    Instructions

    Step 1: Cook the Chicken

    Season chicken with:

    • Ranch seasoning
    • Garlic powder
    • Onion powder
    • Smoked paprika
    • Chili powder
    • Salt
    • Pepper
    • Lime juice

    Heat olive oil in a skillet.

    Cook chicken until golden and cooked through:

    6โ€“8 minutes per side

    Let rest, then shred or chop.


    Step 2: Make the Ranch Sauce

    Mix together:

    • Ranch dressing
    • Sour cream

    For extra flavor add:

    • Garlic powder
    • Lime juice
    • Cilantro

    Stir until creamy.


    Step 3: Warm the Tortillas

    Heat tortillas on a skillet for:

    15โ€“20 seconds per side

    until soft and flexible.


    Step 4: Assemble the Burritos

    Place tortilla flat.

    Add layers:

    1. Rice
    2. Ranch chicken
    3. Black beans
    4. Corn
    5. Cheese
    6. Ranch sauce
    7. Cilantro

    Fold sides inward and roll tightly.


    Step 5: Toast the Burritos (Optional)

    Place burritos seam-side down in a skillet.

    Cook:

    2โ€“3 minutes per side

    until golden and crispy.


    Extra Recipe Tips & Variations โœจ

    ๐Ÿฅ“ Bacon Ranch Chicken Burritos

    Add crispy bacon for a smoky, creamy flavor combination.


    ๐ŸŒถ๏ธ Spicy Ranch Chicken Burritos

    Add:

    • Jalapeรฑos
    • Buffalo sauce
    • Chipotle peppers

    for extra heat.


    ๐Ÿง€ Extra Cheesy Burritos

    Add:

    • Queso sauce
    • Extra Monterey Jack

    before rolling.


    ๐Ÿฅ‘ California Style Burrito

    Add:

    • French fries
    • Guacamole
    • Sour cream

    for a restaurant-style version.


    ๐Ÿš Low-Carb Ranch Chicken Bowl

    Skip tortillas and serve everything over:

    • Lettuce
    • Cauliflower rice
    • Salad greens

    Flavor Upgrades / Secret Tips ๐Ÿ”ฅ

    โœ… Use chicken thighs for extra juicy filling.

    โœ… Toast the burrito after rollingโ€”it adds a crispy restaurant-style finish.

    โœ… Warm tortillas before filling so they donโ€™t tear.

    โœ… Add fresh lime juice at the end to brighten the flavors.

    โœ… Mix ranch seasoning into the rice for extra flavor.

    โœ… Let assembled burritos rest a few minutes before slicing.


    Serving Ideas ๐Ÿฝ๏ธ

    Serve with:

    ๐ŸŒถ๏ธ Salsa verde
    ๐Ÿฅ‘ Guacamole
    ๐Ÿ… Pico de gallo
    ๐Ÿง€ Queso dip
    ๐ŸŸ Fries
    ๐Ÿฅ— Fresh salad
    ๐ŸŒฝ Mexican street corn

    Perfect for:

    • Family dinners
    • Meal prep
    • Lunch boxes
    • Game nights
    • Taco Tuesday

    Storage & Meal Prep Tips ๐Ÿฅก

    Refrigerator:

    Store wrapped burritos for:

    3โ€“4 days


    Freezer:

    Wrap tightly in foil and freeze for:

    up to 3 months


    Reheating:

    Microwave:
    2โ€“3 minutes until hot

    Skillet:
    Toast until crispy

    Air fryer:
    375ยฐF (190ยฐC) for 8โ€“10 minutes


    Meal Prep:

    Make several burritos at once, freeze individually, and reheat whenever you need a quick meal.


    Nutrition Facts (Approximate)

    Per burrito:

    • Calories: 650โ€“800 kcal
    • Protein: 40โ€“50 g
    • Carbohydrates: 60โ€“75 g
    • Fat: 25โ€“35 g

    (Nutrition varies depending on cheese, rice, and tortilla size.)


    Frequently Asked Questions (Q&A)

    Q: Can I use rotisserie chicken?
    A: Yes! It makes this recipe quick and easy. Just mix with ranch seasoning.

    Q: What cheese is best for chicken burritos?
    A: Monterey Jack, cheddar, and Oaxaca cheese melt beautifully.

    Q: Can I freeze ranch chicken burritos?
    A: Yes. Wrap tightly and freeze for up to 3 months.

    Q: How do I keep burritos from getting soggy?
    A: Cool hot ingredients slightly before assembling and keep sauces away from the tortilla edges.

    Q: Can I make these spicy?
    A: Add jalapeรฑos, hot sauce, or chipotle peppers for extra kick.


    Social Media Captions โค๏ธ

    Option 1 (Facebook Style)

    “Dinner idea everyone will love ๐ŸŒฏ๐Ÿ— These Ranch Chicken Burritos are loaded with juicy chicken, creamy ranch flavor, cheese, rice, and all the good stuff wrapped in a warm tortilla!”

    Option 2 (Instagram Style)

    “Creamy ranch + cheesy chicken + a warm tortilla = burrito perfection ๐ŸŒฏโœจ”

    Option 3 (Short Viral Caption)

    “The burrito that makes everyone ask for seconds ๐ŸŒฏ๐Ÿ”ฅ”

    Option 4 (Homestyle Caption)

    “Some meals are pure comfort โค๏ธ These homemade Ranch Chicken Burritos are filling, flavorful, and made for sharing with family.”


    Final Food Description for Posting ๐Ÿด

    Ranch Chicken Burritos are a delicious homemade meal filled with tender seasoned chicken, creamy ranch sauce, melted cheese, rice, beans, and fresh toppings wrapped inside a warm flour tortilla. Cheesy, satisfying, and packed with flavor, these burritos are the perfect easy dinner or meal prep recipe. ๐ŸŒฏ๐Ÿ—๐Ÿง€โœจ

  • Greek Crispy Chicken Tacos

    Greek Crispy Chicken Tacos

    (Crunchy Chicken Tacos with Fresh Greek Flavors, Tzatziki & Feta)

    These Greek Crispy Chicken Tacos are a delicious fusion of Mexican taco comfort food and Mediterranean flavors. Crispy seasoned chicken is tucked into warm tortillas and topped with creamy tzatziki sauce, fresh vegetables, feta cheese, and herbs.

    Every bite brings the perfect combination of crunchy, creamy, fresh, and savory flavors. Theyโ€™re easy enough for a weeknight dinner but impressive enough for guests!


    Full Recipe (Ingredients + Instructions)

    Ingredients

    For the Crispy Chicken:

    • 1ยฝ pounds boneless chicken thighs or chicken breasts
    • 1 cup buttermilk
    • 1 tablespoon lemon juice
    • 2 cloves garlic, minced
    • 1 teaspoon dried oregano
    • 1 teaspoon paprika
    • 1 teaspoon salt
    • ยฝ teaspoon black pepper

    For the Crispy Coating:

    • 1ยฝ cups panko breadcrumbs
    • ยฝ cup all-purpose flour
    • 1 teaspoon garlic powder
    • 1 teaspoon onion powder
    • 1 teaspoon oregano
    • ยฝ teaspoon paprika
    • ยฝ teaspoon salt
    • ยผ teaspoon black pepper

    For the Tacos:

    • 8โ€“10 flour or corn tortillas
    • 1 cup shredded lettuce
    • 1 cup diced cucumber
    • 1 cup cherry tomatoes, halved
    • ยฝ red onion, thinly sliced
    • ยฝ cup crumbled feta cheese
    • Fresh parsley or dill
    • Lemon wedges

    Homemade Tzatziki Sauce

    Ingredients:

    • 1 cup Greek yogurt
    • ยฝ cucumber, grated and drained
    • 2 cloves garlic, minced
    • 1 tablespoon olive oil
    • 1 tablespoon lemon juice
    • 1 tablespoon fresh dill
    • Salt and pepper to taste

    Instructions

    Step 1: Marinate the Chicken

    Cut chicken into strips or bite-sized pieces.

    Combine:

    • Buttermilk
    • Lemon juice
    • Garlic
    • Oregano
    • Paprika
    • Salt
    • Pepper

    Add chicken and marinate:

    30 minutes to overnight

    for maximum flavor.


    Step 2: Prepare the Crispy Coating

    Mix together:

    • Panko breadcrumbs
    • Flour
    • Garlic powder
    • Onion powder
    • Oregano
    • Paprika
    • Salt
    • Pepper

    Remove chicken from marinade and coat well.


    Step 3: Cook the Chicken

    Air Fryer:

    Cook at:

    400ยฐF (200ยฐC) for 12โ€“15 minutes

    until crispy and cooked through.

    Oven:

    Bake at:

    425ยฐF (220ยฐC) for 20โ€“25 minutes

    until golden.

    Fried:

    Fry in oil until crispy and cooked.


    Step 4: Make the Tzatziki

    Mix:

    • Greek yogurt
    • Cucumber
    • Garlic
    • Olive oil
    • Lemon juice
    • Dill
    • Salt
    • Pepper

    Chill until ready to use.


    Step 5: Assemble the Tacos

    Warm tortillas.

    Add:

    1. Crispy chicken
    2. Lettuce
    3. Cucumber
    4. Tomatoes
    5. Red onion
    6. Feta cheese
    7. Tzatziki sauce

    Finish with:

    • Fresh herbs
    • Lemon juice

    Serve immediately.


    Extra Recipe Tips & Variations โœจ

    ๐Ÿง€ Greek Chicken Feta Tacos

    Add extra:

    • Feta cheese
    • Roasted peppers

    for a richer flavor.


    ๐ŸŒถ๏ธ Spicy Greek Tacos

    Add:

    • Chili flakes
    • Spicy feta sauce
    • Pickled jalapeรฑos

    for heat.


    ๐Ÿฅ™ Greek Street Food Style

    Serve chicken in:

    • Warm pita bread

    instead of tortillas.


    ๐Ÿฅ‘ Mediterranean Taco Bowl

    Serve over:

    • Rice
    • Couscous
    • Salad greens

    for a lighter meal.


    ๐Ÿค Greek Shrimp Tacos

    Replace chicken with:

    • Garlic lemon shrimp

    for a seafood version.


    Flavor Upgrades / Secret Tips ๐Ÿ”ฅ

    โœ… Marinate chicken overnight for the juiciest texture.

    โœ… Use panko breadcrumbs for extra crunch.

    โœ… Drain cucumber well so tzatziki stays thick and creamy.

    โœ… Warm tortillas before servingโ€”they taste fresher and fold better.

    โœ… Add fresh lemon right before eating to brighten all flavors.

    โœ… A little oregano in every layer gives authentic Greek flavor.


    Serving Ideas ๐Ÿฝ๏ธ

    Serve with:

    ๐Ÿฅ— Greek salad
    ๐ŸŸ Crispy potatoes
    ๐Ÿฅ’ Extra tzatziki
    ๐Ÿซ“ Warm pita bread
    ๐Ÿ‹ Lemon wedges
    ๐Ÿซ’ Olives

    Perfect for:

    • Taco nights
    • Family dinners
    • Summer gatherings
    • Meal prep lunches
    • Parties

    Storage & Meal Prep Tips ๐Ÿฅก

    Refrigerator:

    Store chicken separately for:

    3โ€“4 days

    Keep toppings and sauce separate.

    Freezer:

    Freeze cooked crispy chicken for:

    up to 2 months

    Reheat before assembling.

    Reheating:

    Air fryer:

    375ยฐF (190ยฐC) for 5โ€“7 minutes

    to bring back the crunch.

    Meal Prep:

    Prepare chicken, tzatziki, and toppings ahead for quick tacos.


    Nutrition Facts (Approximate)

    Per 2 tacos:

    • Calories: 500โ€“650 kcal
    • Protein: 35โ€“45 g
    • Carbohydrates: 45โ€“55 g
    • Fat: 20โ€“30 g

    (Nutrition varies depending on tortillas and cooking method.)


    Frequently Asked Questions (Q&A)

    Q: Can I use chicken thighs instead of breast?
    A: Yes! Chicken thighs stay extra juicy and flavorful.

    Q: Can I make these gluten-free?
    A: Yes. Use gluten-free tortillas and breadcrumbs.

    Q: What makes these tacos Greek-style?
    A: The combination of oregano chicken, tzatziki, feta, cucumber, and fresh herbs gives them Mediterranean flavor.

    Q: Can I make the chicken ahead?
    A: Yes. Reheat in an air fryer or oven to keep it crispy.

    Q: What sauce goes best with these tacos?
    A: Homemade tzatziki is the classic choice, but garlic yogurt sauce also works.


    Social Media Captions โค๏ธ

    Option 1 (Facebook Style)

    “These Greek Crispy Chicken Tacos are a flavor-packed fusion ๐ŸŒฎ๐Ÿ‡ฌ๐Ÿ‡ท Crispy chicken, creamy tzatziki, fresh veggies, and feta all wrapped in a warm tortilla!”

    Option 2 (Instagram Style)

    “Taco night got a Mediterranean makeover ๐Ÿ˜๐ŸŒฎ Crispy chicken + tzatziki + feta = perfection!”

    Option 3 (Short Viral Caption)

    “Greek flavors, taco style ๐Ÿ”ฅ๐Ÿ‡ฌ๐Ÿ‡ท๐ŸŒฎ”

    Option 4 (Homestyle Caption)

    “Trying something new tonight โค๏ธ These homemade Greek Crispy Chicken Tacos bring together the best of two cuisines in every delicious bite.”


    Final Food Description for Posting ๐Ÿด

    Greek Crispy Chicken Tacos combine crunchy golden chicken with fresh Mediterranean toppings like creamy tzatziki, cucumber, tomatoes, feta cheese, and herbs. This delicious fusion recipe is fresh, flavorful, and packed with the perfect balance of crispy, creamy, and savory flavors. ๐ŸŒฎ๐Ÿ‡ฌ๐Ÿ‡ท๐Ÿ—โœจ

  • This homemade taco sauce

    This homemade taco sauce

    (Easy Restaurant-Style Taco Sauce with Bold Mexican Flavor)

    This Homemade Taco Sauce is the perfect topping for tacos, burritos, quesadillas, nachos, and more. Made with simple pantry ingredients, this sauce is smooth, tangy, slightly smoky, and packed with the perfect blend of spices.

    It tastes even better than store-bought taco sauce and can be customized from mild to extra spicy!


    Full Recipe (Ingredients + Instructions)

    Ingredients

    • 1 can (15 oz) tomato sauce
    • 2 tablespoons tomato paste
    • ยฝ cup water
    • 2 tablespoons apple cider vinegar
    • 1 tablespoon lime juice
    • 1 tablespoon honey or sugar
    • 1 teaspoon chili powder
    • 1 teaspoon smoked paprika
    • 1 teaspoon cumin
    • 1 teaspoon garlic powder
    • 1 teaspoon onion powder
    • ยฝ teaspoon oregano
    • ยฝ teaspoon salt
    • ยผ teaspoon black pepper
    • ยผ teaspoon cayenne pepper (optional)

    Optional Additions:

    • 1โ€“2 chipotle peppers in adobo sauce
    • Fresh jalapeรฑo
    • Serrano pepper
    • Hot sauce
    • Fresh cilantro

    Instructions

    Step 1: Combine Ingredients

    Add to a saucepan:

    • Tomato sauce
    • Tomato paste
    • Water
    • Vinegar
    • Lime juice
    • Honey/sugar
    • All seasonings

    Whisk until smooth.


    Step 2: Simmer the Sauce

    Bring sauce to a gentle simmer.

    Cook for:

    15โ€“20 minutes

    stirring occasionally.

    This allows the flavors to blend and the sauce to thicken.


    Step 3: Blend (Optional)

    For an extra smooth restaurant-style taco sauce:

    Blend until silky smooth.


    Step 4: Cool & Store

    Let cool completely.

    Transfer to a jar or bottle.

    Refrigerate before serving for the best flavor.


    Extra Recipe Tips & Variations โœจ

    ๐ŸŒถ๏ธ Spicy Taco Sauce

    Add:

    • Extra cayenne
    • Serrano peppers
    • Chipotle peppers

    for more heat.


    ๐Ÿ”ฅ Smoky Chipotle Taco Sauce

    Blend in:

    • 2 chipotle peppers
    • 1 tablespoon adobo sauce

    for a smoky, spicy flavor.


    ๐ŸŒฟ Fresh Taco Sauce

    Add:

    • Fresh cilantro
    • Fresh lime juice
    • Roasted jalapeรฑos

    for a fresher salsa-style sauce.


    ๐ŸŒฎ Creamy Taco Sauce

    Mix with:

    • Sour cream
    • Mexican crema
    • Mayo

    for a taco truck-style creamy sauce.


    Flavor Upgrades / Secret Tips ๐Ÿ”ฅ

    โœ… Simmering the sauce makes the flavor deeper and richer.

    โœ… A small amount of vinegar gives it that classic taco sauce tang.

    โœ… Smoked paprika adds a restaurant-style smoky taste.

    โœ… Let the sauce sit overnightโ€”the flavors become even better.

    โœ… Adjust sweetness depending on your tomato sauce.

    โœ… Strain or blend for a smooth bottled-style texture.


    Serving Ideas ๐Ÿฝ๏ธ

    Perfect on:

    ๐ŸŒฎ Beef tacos
    ๐Ÿ— Chicken tacos
    ๐Ÿค Shrimp tacos
    ๐ŸŒฏ Burritos
    ๐Ÿง€ Quesadillas
    ๐ŸŸ Nachos
    ๐Ÿฅช Sandwiches
    ๐Ÿฅš Breakfast burritos


    Storage & Meal Prep Tips ๐Ÿฅก

    Refrigerator:

    Store in an airtight jar for:

    2โ€“3 weeks


    Freezer:

    Freeze for:

    up to 3 months

    Thaw in the refrigerator before using.


    Meal Prep:

    Make a double batch and keep it ready for taco nights.


    Nutrition Facts (Approximate)

    Per 2 tablespoons:

    • Calories: 15โ€“25 kcal
    • Protein: 0 g
    • Carbohydrates: 3โ€“5 g
    • Fat: 0 g

    (Nutrition varies depending on sweeteners used.)


    Frequently Asked Questions (Q&A)

    Q: Is homemade taco sauce spicy?
    A: You control the heat. Keep it mild or add peppers for extra spice.

    Q: How long does homemade taco sauce last?
    A: About 2โ€“3 weeks refrigerated in a clean sealed jar.

    Q: Can I use fresh tomatoes instead of tomato sauce?
    A: Yes. Cook and blend roasted tomatoes for a fresher version.

    Q: Can I make it without sugar?
    A: Yes. The sugar only balances the acidity of the tomatoes.

    Q: What makes taco sauce different from salsa?
    A: Taco sauce is usually smoother, thinner, and more seasoned than chunky salsa.


    Social Media Captions โค๏ธ

    Option 1 (Facebook Style)

    “Iโ€™ll never buy taco sauce again ๐ŸŒฎ๐Ÿ”ฅ This homemade taco sauce is smoky, tangy, and packed with flavor. Perfect for taco night!”

    Option 2 (Instagram Style)

    “The secret to amazing tacos? Homemade sauce ๐ŸŒฎโœจ Easy, flavorful, and better than store-bought!”

    Option 3 (Short Viral Caption)

    “The taco sauce your tacos have been waiting for ๐ŸŒถ๏ธ๐ŸŒฎ”

    Option 4 (Homestyle Caption)

    “Little homemade touches make every meal better โค๏ธ This taco sauce is simple, delicious, and made to bring extra flavor to the table.”


    Final Food Description for Posting ๐Ÿด

    This Homemade Taco Sauce is a smooth, flavorful Mexican-inspired sauce made with tomatoes, spices, lime, and a touch of smoky seasoning. Tangy, slightly spicy, and incredibly easy to make, itโ€™s the perfect finishing touch for tacos, burritos, nachos, and all your favorite Mexican dishes. ๐ŸŒฎ๐ŸŒถ๏ธโœจ

  • QUESO STEAK FAJITA SKILLET

    (Sizzling Steak, Peppers & Onions Covered in Creamy Queso Cheese Sauce)

    This Queso Steak Fajita Skillet is a delicious Tex-Mex inspired meal loaded with juicy seasoned steak, colorful bell peppers, caramelized onions, and a creamy cheesy queso sauce. Everything cooks together in one skillet for an easy, flavorful dinner that tastes like your favorite Mexican restaurant.

    Perfect served with warm tortillas, rice, chips, or enjoyed straight from the skillet!


    Full Recipe (Ingredients + Instructions)

    Ingredients

    For the Steak:

    • 2 pounds sirloin steak, flank steak, or skirt steak, sliced thin
    • 2 tablespoons olive oil
    • 2 teaspoons fajita seasoning
    • 1 teaspoon chili powder
    • 1 teaspoon smoked paprika
    • 1 teaspoon garlic powder
    • 1 teaspoon onion powder
    • ยฝ teaspoon cumin
    • ยฝ teaspoon black pepper
    • 1 teaspoon salt
    • Juice of 1 lime

    For the Fajita Vegetables:

    • 2 tablespoons butter or olive oil
    • 1 large onion, sliced
    • 2 bell peppers (red and green), sliced
    • 3 cloves garlic, minced
    • 1 jalapeรฑo, sliced (optional)
    • 1 teaspoon fajita seasoning

    For the Queso Sauce:

    • 2 tablespoons butter
    • 2 tablespoons flour
    • 1ยฝ cups milk
    • 2 cups shredded Monterey Jack cheese
    • 1 cup shredded cheddar cheese
    • ยฝ cup cream cheese
    • ยฝ cup diced green chiles
    • ยฝ teaspoon cumin
    • ยฝ teaspoon garlic powder
    • Salt and pepper to taste

    For Topping:

    • Fresh cilantro
    • Pico de gallo
    • Sliced avocado
    • Sour cream
    • Jalapeรฑos
    • Lime wedges

    Instructions

    Step 1: Season the Steak

    In a bowl combine:

    • Steak slices
    • Olive oil
    • Fajita seasoning
    • Chili powder
    • Smoked paprika
    • Garlic powder
    • Onion powder
    • Cumin
    • Salt
    • Pepper
    • Lime juice

    Mix well and let marinate:

    20โ€“30 minutes

    (for best flavor).


    Step 2: Cook the Steak

    Heat a large cast iron skillet over medium-high heat.

    Add steak and cook:

    2โ€“4 minutes per side

    until nicely browned.

    Remove steak and set aside.


    Step 3: Cook the Fajita Vegetables

    In the same skillet add:

    • Butter
    • Onion
    • Bell peppers

    Cook:

    5โ€“7 minutes

    until softened and slightly charred.

    Add garlic and cook:

    30 seconds.


    Step 4: Make the Queso Sauce

    In a saucepan or skillet:

    Melt butter.

    Whisk in flour and cook:

    1 minute.

    Slowly add milk while whisking.

    Cook until slightly thickened.

    Add:

    • Monterey Jack
    • Cheddar
    • Cream cheese
    • Green chiles

    Stir until smooth and creamy.

    Season with:

    • Cumin
    • Garlic powder
    • Salt
    • Pepper

    Step 5: Combine Everything

    Return steak to the skillet.

    Pour queso sauce over the steak and vegetables.

    Simmer:

    2โ€“3 minutes

    until everything is hot and combined.


    Step 6: Serve

    Top with:

    • Cilantro
    • Pico de gallo
    • Avocado
    • Extra cheese

    Serve immediately.


    Extra Recipe Tips & Variations โœจ

    ๐ŸŒฎ Steak Fajita Tacos

    Serve the skillet filling inside:

    • Warm flour tortillas
    • Corn tortillas

    with your favorite toppings.


    ๐Ÿš Queso Steak Rice Bowl

    Serve over:

    • Mexican rice
    • Cilantro lime rice

    for a complete meal.


    ๐Ÿฅ“ Loaded Queso Steak Skillet

    Add:

    • Crispy bacon
    • Potatoes

    for a hearty version.


    ๐ŸŒถ๏ธ Spicy Version

    Add:

    • Hatch green chile
    • Serrano peppers
    • Chipotle peppers

    for extra smoky heat.


    ๐Ÿค Surf & Turf Skillet

    Add:

    • Shrimp

    with the steak for a restaurant-style meal.


    Flavor Upgrades / Secret Tips ๐Ÿ”ฅ

    โœ… Use skirt steak or flank steak for authentic fajita flavor.

    โœ… Slice steak against the grain for tender bites.

    โœ… Cook steak quickly over high heat to keep it juicy.

    โœ… Let the steak rest before slicing.

    โœ… Char the peppers and onions slightly for smoky fajita flavor.

    โœ… Use freshly shredded cheese for a smoother queso.

    โœ… Add a splash of milk if queso becomes too thick.


    Serving Ideas ๐Ÿฝ๏ธ

    Serve with:

    ๐ŸŒฎ Warm tortillas
    ๐Ÿš Mexican rice
    ๐Ÿซ˜ Refried beans
    ๐Ÿฅ‘ Guacamole
    ๐ŸŒฝ Street corn
    ๐ŸŸ Tortilla chips
    ๐Ÿ… Pico de gallo

    Perfect for:

    • Family dinners
    • Game nights
    • Cinco de Mayo
    • Taco nights
    • Weekend gatherings

    Storage & Meal Prep Tips ๐Ÿฅก

    Refrigerator:

    Store leftovers in an airtight container for:

    3โ€“4 days


    Freezer:

    Freeze steak and vegetables separately for:

    up to 2 months

    (Queso sauce is best made fresh.)


    Reheating:

    Warm slowly on the stove.

    Add:

    • Milk
    • Cream

    to bring queso back to a smooth texture.


    Meal Prep:

    Prepare steak and vegetables ahead, then make fresh queso when serving.


    Nutrition Facts (Approximate)

    Per serving:

    • Calories: 650โ€“800 kcal
    • Protein: 45โ€“55 g
    • Carbohydrates: 15โ€“25 g
    • Fat: 45โ€“55 g

    (Nutrition varies depending on cheese and serving size.)


    Frequently Asked Questions (Q&A)

    Q: What steak is best for fajitas?
    A: Skirt steak and flank steak are traditional, but sirloin works well too.

    Q: Can I make this with chicken?
    A: Yes! Chicken breast or thighs work perfectly with the same fajita seasoning.

    Q: How do I keep queso creamy?
    A: Keep heat low and add a splash of milk when reheating.

    Q: Can I make this ahead of time?
    A: Yes. Prepare the steak and vegetables ahead, then warm and add queso before serving.

    Q: What cheese melts best for queso?
    A: Monterey Jack, Chihuahua cheese, and American cheese create the smoothest queso.


    Social Media Captions โค๏ธ

    Option 1 (Facebook Style)

    “Dinner was a hit with this Queso Steak Fajita Skillet ๐Ÿฅฉ๐ŸŒถ๏ธ๐Ÿง€ Juicy steak, sizzling peppers, onions, and creamy queso all cooked together in one skillet!”

    Option 2 (Instagram Style)

    “Steak + fajitas + queso = the ultimate comfort food ๐Ÿ”ฅ๐Ÿง€ This skillet is loaded with flavor!”

    Option 3 (Short Viral Caption)

    “The skillet everyone will fight over ๐Ÿฅฉ๐Ÿง€๐Ÿ”ฅ”

    Option 4 (Homestyle Caption)

    “Nothing brings people together like a hot skillet full of cheesy goodness โค๏ธ This homemade steak fajita skillet is packed with bold flavors and made for sharing.”


    Final Food Description for Posting ๐Ÿด

    Queso Steak Fajita Skillet is a mouthwatering Tex-Mex dish featuring tender seasoned steak, sizzling peppers and onions, all covered in a creamy homemade queso cheese sauce. Loaded with bold fajita flavors and perfect for dipping, stuffing into tortillas, or enjoying straight from the skillet, this recipe is comfort food at its best. ๐Ÿฅฉ๐ŸŒถ๏ธ๐Ÿง€โœจ

  • homemade Creamy Chicken Alfredo

    homemade Creamy Chicken Alfredo

    (Rich, Silky Garlic Parmesan Alfredo Sauce with Tender Chicken)

    This Homemade Creamy Chicken Alfredo is the ultimate comfort food made with tender seasoned chicken, perfectly cooked pasta, and a rich homemade garlic Parmesan cream sauce. Unlike store-bought versions, this Alfredo is smooth, flavorful, and made from simple ingredients that create a restaurant-quality meal right at home.

    Perfect for family dinners, date nights, holidays, or whenever youโ€™re craving a creamy pasta dish everyone loves.


    Full Recipe (Ingredients + Instructions)

    Ingredients

    For the Chicken:

    • 2 pounds boneless, skinless chicken breasts or thighs
    • 2 tablespoons olive oil
    • 1 teaspoon salt
    • 1 teaspoon black pepper
    • 1 teaspoon garlic powder
    • 1 teaspoon Italian seasoning
    • 1 teaspoon paprika
    • ยฝ teaspoon onion powder

    For the Alfredo Sauce:

    • 4 tablespoons unsalted butter
    • 5 cloves garlic, minced
    • 2 cups heavy cream
    • 1 cup whole milk
    • 2 cups freshly grated Parmesan cheese
    • ยฝ teaspoon salt
    • ยฝ teaspoon black pepper
    • 1 teaspoon Italian seasoning
    • ยผ teaspoon nutmeg (optional, for classic Alfredo flavor)

    For the Pasta:

    • 1 pound fettuccine pasta
    • Salt for pasta water

    Garnish:

    • Fresh parsley
    • Extra Parmesan cheese
    • Cracked black pepper

    Instructions

    Step 1: Cook the Pasta

    Bring a large pot of salted water to a boil.

    Cook fettuccine according to package directions until:

    Al dente

    Reserve:

    1 cup pasta water

    before draining.


    Step 2: Season & Cook the Chicken

    Slice chicken into strips.

    Season with:

    • Salt
    • Pepper
    • Garlic powder
    • Italian seasoning
    • Paprika
    • Onion powder

    Heat olive oil in a large skillet.

    Cook chicken:

    5โ€“7 minutes per side

    until golden and cooked through.

    Remove and set aside.


    Step 3: Make the Alfredo Sauce

    In the same skillet melt butter.

    Add garlic and cook:

    30 seconds

    until fragrant.

    Add:

    • Heavy cream
    • Milk

    Simmer gently for:

    3โ€“5 minutes

    (do not boil).

    Slowly stir in Parmesan cheese until melted and smooth.

    Season with:

    • Salt
    • Pepper
    • Italian seasoning
    • Nutmeg (optional)

    Step 4: Combine Everything

    Add cooked pasta to the sauce.

    Toss until coated.

    Add pasta water as needed until the sauce reaches a silky consistency.

    Top with cooked chicken.


    Step 5: Serve

    Garnish with:

    • Fresh parsley
    • Parmesan cheese
    • Black pepper

    Serve warm.


    Extra Recipe Tips & Variations โœจ

    ๐Ÿฅ“ Chicken Bacon Alfredo

    Add:

    • Crispy bacon pieces

    for a smoky upgrade.


    ๐Ÿค Chicken & Shrimp Alfredo

    Add:

    • Garlic butter shrimp

    for a restaurant-style combination.


    ๐ŸŒฟ Spinach Chicken Alfredo

    Add:

    • Fresh spinach
    • Mushrooms

    for extra flavor and vegetables.


    ๐ŸŒถ๏ธ Cajun Chicken Alfredo

    Season chicken with:

    • Cajun seasoning
    • Smoked paprika

    for a spicy twist.


    ๐Ÿง€ Extra Cheesy Alfredo

    Add:

    • Cream cheese
    • Mozzarella

    for an extra rich sauce.


    Flavor Upgrades / Secret Tips ๐Ÿ”ฅ

    โœ… Use freshly grated Parmesanโ€”pre-shredded cheese can make the sauce grainy.

    โœ… Cook chicken with seasoning before adding it to the pasta for maximum flavor.

    โœ… Save pasta waterโ€”it helps create a smooth, restaurant-style sauce.

    โœ… Add garlic slowly so it doesnโ€™t burn.

    โœ… A small pinch of nutmeg enhances the cream sauce.

    โœ… Let the sauce thicken gently; high heat can cause separation.


    Serving Ideas ๐Ÿฝ๏ธ

    Serve with:

    ๐Ÿฅ– Garlic bread
    ๐Ÿฅ— Caesar salad
    ๐Ÿ… Bruschetta
    ๐Ÿฅฆ Roasted vegetables
    ๐Ÿท White wine

    Perfect for:

    • Family dinners
    • Romantic dinners
    • Sunday meals
    • Holiday gatherings
    • Comfort food nights

    Storage & Meal Prep Tips ๐Ÿฅก

    Refrigerator:

    Store leftovers in an airtight container for:

    3โ€“4 days


    Freezer:

    Freeze for:

    up to 2 months

    (Cream sauce texture may change slightly.)


    Reheating:

    Warm gently on the stove.

    Add:

    • Splash of milk
    • Cream
    • Chicken broth

    to bring the sauce back together.


    Meal Prep:

    Cook chicken ahead and prepare sauce fresh when serving for the best texture.


    Nutrition Facts (Approximate)

    Per serving:

    • Calories: 700โ€“850 kcal
    • Protein: 45โ€“55 g
    • Carbohydrates: 55โ€“65 g
    • Fat: 35โ€“45 g

    (Nutrition varies depending on pasta and cream amounts.)


    Frequently Asked Questions (Q&A)

    Q: What pasta is best for Chicken Alfredo?
    A: Fettuccine is traditional because the wide noodles hold the creamy sauce perfectly.

    Q: Why did my Alfredo sauce become thick?
    A: Pasta absorbs sauce as it sits. Add warm milk or pasta water to loosen it.

    Q: Can I use half-and-half instead of heavy cream?
    A: Yes, but the sauce will be lighter and less rich.

    Q: Can I make Alfredo without chicken?
    A: Absolutely. Add shrimp, vegetables, or keep it classic.

    Q: How do restaurants make Alfredo so creamy?
    A: Fresh Parmesan, butter, cream, and properly emulsified pasta water create that silky texture.


    Social Media Captions โค๏ธ

    Option 1 (Facebook Style)

    “Tonightโ€™s dinner was this Homemade Creamy Chicken Alfredo ๐Ÿ๐Ÿ— Rich garlic Parmesan sauce, tender chicken, and perfectly cooked pastaโ€”comfort food at its best!”

    Option 2 (Instagram Style)

    “Creamy, dreamy, and made from scratch ๐Ÿค๐Ÿ This Chicken Alfredo is the ultimate comfort meal!”

    Option 3 (Short Viral Caption)

    “Restaurant-style Alfredo made at home ๐Ÿโœจ”

    Option 4 (Homestyle Caption)

    “Some meals just bring everyone together โค๏ธ This homemade Chicken Alfredo is creamy, comforting, and made with love for the whole family.”


    Final Food Description for Posting ๐Ÿด

    Homemade Creamy Chicken Alfredo is a rich and comforting pasta dish made with tender seasoned chicken, fettuccine noodles, and a silky garlic Parmesan cream sauce. Creamy, flavorful, and restaurant-quality, this classic Italian-inspired meal is the perfect dinner for any occasion. ๐Ÿ๐Ÿ—๐Ÿง„โœจ

  • White Chocolate Macadamia Nut Cookies

    White Chocolate Macadamia Nut Cookies

    (Soft, Chewy Cookies Loaded with White Chocolate Chips & Buttery Macadamia Nuts)

    These White Chocolate Macadamia Nut Cookies are a bakery-style favorite with golden crispy edges, a soft chewy center, creamy white chocolate chips, and rich buttery macadamia nuts in every bite.

    Sweet, nutty, and perfectly balanced, these cookies are easy to make and taste just like the ones from your favorite bakery. Perfect for holidays, cookie exchanges, afternoon coffee, or a homemade dessert everyone loves.


    Full Recipe (Ingredients + Instructions)

    Ingredients

    Cookie Dough:

    • 2ยฝ cups all-purpose flour
    • 1 teaspoon baking soda
    • ยฝ teaspoon salt
    • 1 cup unsalted butter, softened
    • ยพ cup brown sugar, packed
    • ยฝ cup granulated sugar
    • 2 large eggs
    • 2 teaspoons vanilla extract
    • 1 tablespoon cornstarch (for extra softness)

    Mix-Ins:

    • 1ยฝ cups white chocolate chips
    • 1 cup macadamia nuts, roughly chopped

    Instructions

    Step 1: Prepare the Dough

    Preheat oven to:

    350ยฐF (175ยฐC)

    Line baking sheets with parchment paper.

    In a bowl combine:

    • Flour
    • Baking soda
    • Salt
    • Cornstarch

    Set aside.


    Step 2: Cream Butter & Sugar

    Beat together:

    • Softened butter
    • Brown sugar
    • Granulated sugar

    for:

    2โ€“3 minutes

    until light and fluffy.


    Step 3: Add Wet Ingredients

    Add:

    • Eggs one at a time
    • Vanilla extract

    Mix until combined.


    Step 4: Combine Dough

    Slowly add dry ingredients.

    Mix just until combined.

    Do not overmix.

    Fold in:

    • White chocolate chips
    • Macadamia nuts

    Step 5: Bake Cookies

    Scoop dough into:

    2 tablespoon-sized balls

    Place on baking sheet.

    Bake:

    10โ€“12 minutes

    until edges are lightly golden.

    Centers should still look slightly soft.


    Step 6: Cool

    Let cookies cool on the baking sheet:

    5 minutes

    before transferring to a cooling rack.


    Extra Recipe Tips & Variations โœจ

    ๐Ÿซ Chocolate White Macadamia Cookies

    Add:

    • Dark chocolate chips

    for a richer flavor.


    ๐Ÿฅฅ Tropical Version

    Add:

    • Shredded coconut

    for a coconut macadamia twist.


    ๐Ÿฏ Brown Butter Version

    Brown the butter first for a deeper caramel-like flavor.


    ๐Ÿช Extra Thick Bakery Cookies

    Chill dough for:

    1โ€“2 hours

    before baking.


    ๐ŸŒŠ Sea Salt White Chocolate Cookies

    Sprinkle with flaky sea salt before baking for a sweet-salty combination.


    Flavor Upgrades / Secret Tips ๐Ÿ”ฅ

    โœ… Use real vanilla extract for the best flavor.

    โœ… Toast macadamia nuts lightly before adding for a richer nutty taste.

    โœ… Do not overbakeโ€”soft centers make the best cookies.

    โœ… Chill the dough if you want thicker bakery-style cookies.

    โœ… Use good-quality white chocolate chips because they make a big difference.

    โœ… Add a pinch of espresso powder to enhance the sweetness.


    Serving Ideas ๐Ÿฝ๏ธ

    Serve with:

    โ˜• Coffee
    ๐Ÿฅ› Cold milk
    ๐Ÿต Tea
    ๐Ÿฆ Vanilla ice cream
    ๐Ÿ“ Fresh berries

    Perfect for:

    • Holiday cookie trays
    • Bake sales
    • Parties
    • Gift boxes
    • Family desserts

    Storage & Meal Prep Tips ๐Ÿฅก

    Room Temperature:

    Store in an airtight container for:

    5โ€“7 days

    Refrigerator:

    Keep dough refrigerated for:

    up to 3 days

    before baking.

    Freezer:

    Freeze cookie dough balls for:

    up to 3 months

    Bake straight from frozen, adding 1โ€“2 extra minutes.

    Reheating:

    Warm cookies for:

    10 seconds

    in the microwave for a fresh-baked texture.


    Nutrition Facts (Approximate)

    Per cookie:

    • Calories: 220โ€“280 kcal
    • Protein: 3โ€“4 g
    • Carbohydrates: 25โ€“35 g
    • Fat: 12โ€“16 g

    (Nutrition varies depending on cookie size and ingredients.)


    Frequently Asked Questions (Q&A)

    Q: Why are my cookies flat?
    A: The butter may have been too warm, or the dough needed more chilling time.

    Q: Can I use salted butter?
    A: Yes. Reduce the added salt slightly.

    Q: How do I make cookies softer?
    A: Add cornstarch and avoid overbaking.

    Q: Can I use other nuts?
    A: Yes. Cashews, pecans, or almonds work well.

    Q: Can I make these ahead?
    A: Yes. Freeze cookie dough balls and bake whenever you want fresh cookies.


    Social Media Captions โค๏ธ

    Option 1 (Facebook Style)

    “Fresh homemade White Chocolate Macadamia Nut Cookies ๐Ÿช๐Ÿค Soft, chewy, buttery, and loaded with creamy white chocolate and crunchy macadamia nuts. These disappear fast!”

    Option 2 (Instagram Style)

    “The perfect cookie doesnโ€™t existโ€ฆ until now ๐Ÿค๐Ÿชโœจ White chocolate + macadamia = pure happiness!”

    Option 3 (Short Viral Caption)

    “Bakery-style cookies right from my kitchen ๐Ÿช๐ŸŒฐ”

    Option 4 (Homestyle Caption)

    “Nothing beats the smell of homemade cookies โค๏ธ These white chocolate macadamia cookies are sweet, buttery, and made for sharing with the people you love.”


    Final Food Description for Posting ๐Ÿด

    White Chocolate Macadamia Nut Cookies are soft, chewy bakery-style cookies filled with creamy white chocolate chips and buttery macadamia nuts. With golden edges, a tender center, and the perfect sweet-and-nutty flavor, these homemade cookies are an irresistible treat for any occasion. ๐Ÿช๐Ÿค๐ŸŒฐโœจ

  • Crispy Chicken Sandwich

    Crispy Chicken Sandwich

    (Crispy Chicken Sandwich with Creamy Mayo & Lettuce โ€“ Fast Food Style at Home)

    The McChicken Sandwich is a classic fast-food favorite featuring a crispy seasoned chicken patty, soft toasted bun, creamy mayonnaise, and fresh shredded lettuce. This homemade version gives you that same nostalgic flavor with a crunchier coating and fresher ingredients.

    Perfect for lunch, quick dinners, game days, or when youโ€™re craving a homemade version of your favorite chicken sandwich.


    Full Recipe (Ingredients + Instructions)

    Ingredients

    For the Chicken Patties:

    • 1ยฝ pounds ground chicken
    • 1 teaspoon salt
    • 1 teaspoon black pepper
    • 1 teaspoon garlic powder
    • 1 teaspoon onion powder
    • 1 teaspoon paprika
    • ยฝ teaspoon dried parsley
    • ยฝ teaspoon cayenne pepper (optional)
    • ยฝ cup mayonnaise
    • 1 tablespoon cornstarch

    For the Crispy Coating:

    • 1 cup all-purpose flour
    • ยฝ cup cornstarch
    • 1 teaspoon paprika
    • 1 teaspoon garlic powder
    • 1 teaspoon onion powder
    • 1 teaspoon salt
    • ยฝ teaspoon black pepper
    • 1 teaspoon baking powder

    For Frying:

    • Vegetable oil

    For the Sandwich:

    • 4โ€“6 hamburger buns
    • 1 cup shredded iceberg lettuce
    • Mayonnaise
    • Pickles (optional)
    • Sliced cheese (optional)

    Instructions

    Step 1: Prepare the Chicken Patties

    In a bowl combine:

    • Ground chicken
    • Salt
    • Pepper
    • Garlic powder
    • Onion powder
    • Paprika
    • Parsley
    • Cayenne
    • Mayonnaise
    • Cornstarch

    Mix until well combined.

    Shape into thin round patties slightly larger than the buns.

    Place in freezer for:

    20โ€“30 minutes

    to help them hold their shape.


    Step 2: Prepare the Coating

    Mix together:

    • Flour
    • Cornstarch
    • Paprika
    • Garlic powder
    • Onion powder
    • Salt
    • Pepper
    • Baking powder

    Coat each chicken patty evenly.

    For extra crunch:

    Dip lightly in cold water, then coat again.


    Step 3: Fry the Chicken

    Heat oil to:

    350ยฐF (175ยฐC)

    Fry patties for:

    4โ€“5 minutes per side

    until:

    โœ… Golden brown
    โœ… Crispy
    โœ… Chicken reaches 165ยฐF (74ยฐC)

    Drain on a wire rack or paper towels.


    Step 4: Assemble the Sandwich

    Toast buns lightly.

    Spread mayonnaise on both sides.

    Add:

    1. Crispy chicken patty
    2. Shredded lettuce
    3. Extra mayo if desired

    Top with bun and serve.


    Extra Recipe Tips & Variations โœจ

    ๐Ÿง€ Deluxe McChicken

    Add:

    • American cheese
    • Tomato slices
    • Pickles

    for a bigger sandwich.


    ๐ŸŒถ๏ธ Spicy McChicken

    Add:

    • Extra cayenne
    • Hot sauce
    • Spicy mayo

    for a fiery version.


    ๐Ÿ— Crispy Chicken Club

    Add:

    • Bacon
    • Cheese
    • Lettuce
    • Tomato

    for a restaurant-style upgrade.


    ๐ŸŒฑ Healthier Version

    Instead of frying:

    • Air fry at 375ยฐF (190ยฐC) for 12โ€“15 minutes
    • Bake until crispy

    Flavor Upgrades / Secret Tips ๐Ÿ”ฅ

    โœ… Keep chicken patties thinโ€”the classic McChicken texture is not thick like a burger.

    โœ… Cornstarch creates a lighter, crispier coating.

    โœ… Freeze patties briefly before frying for better shape.

    โœ… Toasting the bun adds a bakery-style flavor.

    โœ… Iceberg lettuce gives the classic crunch.

    โœ… Add a pinch of sugar to the mayo for a fast-food style sauce.


    Serving Ideas ๐Ÿฝ๏ธ

    Serve with:

    ๐ŸŸ French fries
    ๐Ÿฅ— Coleslaw
    ๐Ÿฅ’ Pickles
    ๐Ÿฅค Cold soda
    ๐Ÿ— Chicken nuggets
    ๐ŸŽ Fruit salad

    Perfect for:

    • Family dinners
    • Kidsโ€™ meals
    • Game nights
    • Weekend treats

    Storage & Meal Prep Tips ๐Ÿฅก

    Refrigerator:

    Store cooked chicken patties for:

    3โ€“4 days

    Keep buns and toppings separate.

    Freezer:

    Freeze cooked patties for:

    up to 2 months

    Reheat before serving.

    Reheating:

    Best methods:

    • Air fryer: 375ยฐF (190ยฐC) for 5โ€“7 minutes
    • Oven: 400ยฐF (200ยฐC) for 10 minutes

    Avoid microwaving to keep the coating crispy.


    Nutrition Facts (Approximate)

    Per sandwich:

    • Calories: 500โ€“650 kcal
    • Protein: 25โ€“35 g
    • Carbohydrates: 45โ€“55 g
    • Fat: 25โ€“35 g

    (Nutrition varies depending on bun size and frying method.)


    Frequently Asked Questions (Q&A)

    Q: What chicken is used in a McChicken?
    A: A thin chicken patty made from seasoned chicken, traditionally formed and breaded.

    Q: Can I use chicken breast instead of ground chicken?
    A: Yes, you can use a thin breaded chicken cutlet for a different texture.

    Q: Can I air fry the chicken?
    A: Yes. Spray lightly with oil and air fry until crispy and cooked through.

    Q: What makes the McChicken sauce special?
    A: The classic flavor comes from creamy mayonnaise paired with crunchy lettuce.

    Q: Can I make these ahead?
    A: Yes. Prepare and freeze chicken patties, then cook when needed.


    Social Media Captions โค๏ธ

    Option 1 (Facebook Style)

    “Homemade Copycat McChicken Sandwich ๐Ÿ”๐Ÿ— Crispy chicken, creamy mayo, fresh lettuce, and that classic fast-food flavor made right in my kitchen!”

    Option 2 (Instagram Style)

    “Forget the drive-thru ๐Ÿ˜๐Ÿ— This homemade McChicken is crispy, juicy, and seriously delicious!”

    Option 3 (Short Viral Caption)

    “Crispy chicken sandwich cravings solved ๐Ÿ”๐Ÿ”ฅ”

    Option 4 (Homestyle Caption)

    “Sometimes the classics are the best โค๏ธ This homemade McChicken Sandwich brings that favorite fast-food flavor straight to your table.”


    Final Food Description for Posting ๐Ÿด

    This Copycat McChicken Sandwich is a crispy, flavorful chicken sandwich made with a seasoned golden chicken patty, creamy mayonnaise, and fresh crunchy lettuce on a soft toasted bun. Easy, delicious, and packed with nostalgic fast-food flavor, this homemade version is perfect for lunch, dinner, or a weekend treat. ๐Ÿ”๐Ÿ—โœจ

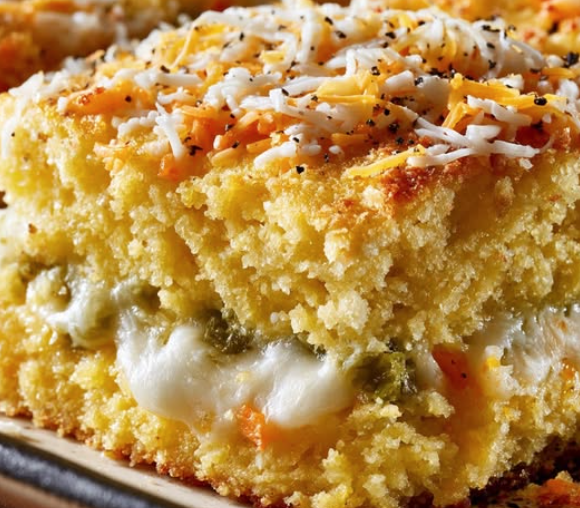
  • Mexican Cornbread

    Mexican Cornbread

    (The Best Homemade Mexican Cornbread โ€“ Moist, Cheesy & Full of Flavor)

    This Mexican Cornbread is a rich, moist, and flavorful twist on classic cornbread. Made with sweet corn, melted cheese, green chiles, and a touch of spice, this recipe creates the perfect balance of sweetness, heat, and savory goodness.

    Itโ€™s soft on the inside, golden on the outside, and packed with Mexican-inspired flavors. Perfect alongside chili, soups, BBQ, tacos, or served warm with butter.


    Full Recipe (Ingredients + Instructions)

    Ingredients

    For the Cornbread:

    • 1 cup yellow cornmeal
    • 1 cup all-purpose flour
    • 1 tablespoon baking powder
    • 1 teaspoon salt
    • ยผ cup granulated sugar (optional)
    • 2 large eggs
    • 1 cup buttermilk
    • ยฝ cup sour cream
    • ยฝ cup melted butter
    • 1 cup whole corn kernels (fresh, frozen, or canned drained)
    • 1 cup shredded cheddar cheese
    • 1 cup shredded Monterey Jack cheese
    • 1 can (4 oz) diced green chiles
    • ยฝ medium onion, finely diced
    • 1โ€“2 jalapeรฑos, finely chopped (optional)

    Optional Additions:

    • Crispy bacon pieces
    • Cooked breakfast sausage
    • Pepper Jack cheese
    • Fresh cilantro
    • Smoked paprika
    • Roasted poblano peppers

    Instructions

    Step 1: Prepare the Oven

    Preheat oven to:

    375ยฐF (190ยฐC)

    Grease a:

    9×13-inch baking dish

    or cast iron skillet.


    Step 2: Mix Dry Ingredients

    In a large bowl combine:

    • Cornmeal
    • Flour
    • Baking powder
    • Salt
    • Sugar

    Mix well.


    Step 3: Mix Wet Ingredients

    In another bowl whisk together:

    • Eggs
    • Buttermilk
    • Sour cream
    • Melted butter

    until smooth.


    Step 4: Combine Everything

    Add wet ingredients into dry ingredients.

    Stir gently.

    Fold in:

    • Corn
    • Green chiles
    • Onion
    • Jalapeรฑos
    • Cheddar cheese
    • Monterey Jack cheese

    Do not overmix.


    Step 5: Bake

    Pour batter into prepared pan.

    Bake:

    35โ€“45 minutes

    until:

    โœ… Golden brown top
    โœ… Center is set
    โœ… Toothpick comes out clean

    Let cool:

    10 minutes

    before slicing.


    Extra Recipe Tips & Variations โœจ

    ๐ŸŒถ๏ธ Hatch Green Chile Cornbread

    Use roasted Hatch green chiles for a smoky New Mexico-style flavor.


    ๐Ÿฅ“ Bacon Cheddar Cornbread

    Add:

    • Crispy bacon
    • Extra cheddar

    for a savory upgrade.


    ๐Ÿง€ Extra Cheesy Version

    Add:

    • More Monterey Jack
    • Pepper Jack cheese

    for a gooey texture.


    ๐ŸŒฝ Sweet Mexican Cornbread

    Add:

    • Extra corn
    • A little honey

    for a sweeter version.


    ๐Ÿ– Cornbread Casserole Style

    Mix in:

    • Ground beef
    • Taco seasoning

    for a complete meal.


    Flavor Upgrades / Secret Tips ๐Ÿ”ฅ

    โœ… Use buttermilk for the softest texture.

    โœ… Add sour creamโ€”it keeps the cornbread moist.

    โœ… A cast iron skillet creates crispy golden edges.

    โœ… Roast your green chiles before adding for deeper flavor.

    โœ… Freshly shredded cheese melts better than pre-shredded.

    โœ… Let the batter rest for 5โ€“10 minutes before baking for a better crumb.


    Serving Ideas ๐Ÿฝ๏ธ

    Serve with:

    ๐Ÿฅฃ Green chile stew
    ๐Ÿฒ Chili
    ๐Ÿ– BBQ ribs
    ๐ŸŒฎ Tacos
    ๐Ÿ— Fried chicken
    ๐Ÿซ˜ Pinto beans
    ๐Ÿฅ— Fresh salad

    Perfect for:

    • Family dinners
    • Holiday meals
    • Potlucks
    • Cookouts
    • Sunday dinners

    Storage & Meal Prep Tips ๐Ÿฅก

    Room Temperature:

    Store covered for:

    1โ€“2 days

    Refrigerator:

    Store in an airtight container for:

    4โ€“5 days

    Freezer:

    Freeze slices for:

    up to 3 months

    Wrap individually before freezing.

    Reheating:

    Warm in oven:

    300ยฐF (150ยฐC) for 10 minutes

    or microwave briefly.


    Nutrition Facts (Approximate)

    Per serving:

    • Calories: 300โ€“400 kcal
    • Protein: 10โ€“15 g
    • Carbohydrates: 35โ€“45 g
    • Fat: 15โ€“25 g

    (Nutrition varies depending on cheese and additions.)


    Frequently Asked Questions (Q&A)

    Q: Is Mexican cornbread spicy?
    A: It can be mild or spicy depending on the amount of jalapeรฑos and green chiles.

    Q: Can I use regular milk instead of buttermilk?
    A: Yes. Add 1 tablespoon of lemon juice or vinegar to 1 cup of milk and let sit for 5 minutes.

    Q: Can I make this gluten-free?
    A: Yes. Use a gluten-free flour blend instead of all-purpose flour.

    Q: Why is my cornbread dry?
    A: Overbaking or too much flour can make it dry. Sour cream and buttermilk help keep it moist.

    Q: Can I make this ahead of time?
    A: Yes. It reheats beautifully and is great for meal prep.


    Social Media Captions โค๏ธ

    Option 1 (Facebook Style)

    “I finally made the Mexican Cornbread everyone talks about ๐ŸŒฝ๐Ÿง€๐ŸŒถ๏ธ Moist, cheesy, packed with corn and green chilesโ€”the perfect side dish for any meal!”

    Option 2 (Instagram Style)

    “The cornbread that steals the show ๐Ÿ˜๐ŸŒฝ Cheesy, golden, and loaded with Mexican flavors!”

    Option 3 (Short Viral Caption)

    “Not your ordinary cornbread ๐ŸŒฝ๐Ÿ”ฅ”

    Option 4 (Homestyle Caption)

    “Some side dishes become family favorites โค๏ธ This homemade Mexican Cornbread is warm, cheesy, and made for sharing around the table.”


    Final Food Description for Posting ๐Ÿด

    Mexican Cornbread is a moist, cheesy, and flavorful homemade side dish loaded with sweet corn, roasted green chiles, and melted cheese. With crispy golden edges and a soft, tender center, this Southern-meets-Mexican favorite is the perfect companion for chili, BBQ, soups, and family dinners. ๐ŸŒฝ๐Ÿง€๐ŸŒถ๏ธโœจ

  • Nutella Donut

    (Soft Homemade Donuts Filled with Creamy Hazelnut Chocolate Spread)

    These Nutella Donuts are fluffy, golden, and filled with rich, creamy Nutella in every bite. Made with soft homemade dough, lightly fried until perfectly golden, then coated with sugar and filled with everyoneโ€™s favorite chocolate hazelnut spread, these donuts are the ultimate sweet treat.

    Perfect for breakfast, dessert, brunch, holidays, or whenever youโ€™re craving something bakery-style at home.


    Full Recipe (Ingredients + Instructions)

    Ingredients

    For the Donut Dough:

    • 4 cups all-purpose flour
    • 2ยผ teaspoons active dry yeast
    • ยพ cup warm milk
    • ยผ cup granulated sugar
    • 2 large eggs
    • ยผ cup unsalted butter, softened
    • 1 teaspoon vanilla extract
    • 1 teaspoon salt

    For Filling & Coating:

    • 1 cup Nutella (or chocolate hazelnut spread)
    • ยฝ cup granulated sugar (for coating)
    • Powdered sugar (optional)
    • Chocolate drizzle (optional)

    For Frying:

    • Vegetable oil, enough for frying

    Instructions

    Step 1: Activate the Yeast

    In a small bowl combine:

    • Warm milk
    • 1 tablespoon sugar
    • Yeast

    Let sit for:

    5โ€“10 minutes

    until foamy.


    Step 2: Make the Dough

    In a large bowl combine:

    • Flour
    • Remaining sugar
    • Salt

    Add:

    • Yeast mixture
    • Eggs
    • Vanilla
    • Butter

    Mix until a soft dough forms.

    Knead for:

    8โ€“10 minutes

    until smooth and elastic.


    Step 3: Let the Dough Rise

    Place dough in a greased bowl.

    Cover and let rise in a warm place for:

    1โ€“2 hours

    until doubled in size.


    Step 4: Shape the Donuts

    Punch down dough.

    Roll out to about:

    ยฝ-inch thickness

    Cut into donut rounds.

    Place on a tray.

    Cover and let rise again:

    30โ€“45 minutes


    Step 5: Fry the Donuts

    Heat oil to:

    350ยฐF (175ยฐC)

    Fry donuts for:

    1โ€“2 minutes per side

    until:

    โœ… Golden brown
    โœ… Puffy
    โœ… Cooked through

    Transfer to paper towels.


    Step 6: Fill with Nutella

    Once donuts cool slightly:

    Fill a piping bag with Nutella.

    Using a small knife or piping tip, create a hole in the side.

    Pipe Nutella inside each donut.

    Roll in sugar or dust with powdered sugar.

    Serve warm.


    Extra Recipe Tips & Variations โœจ

    ๐Ÿ“ Nutella Strawberry Donuts

    Add fresh strawberries inside with Nutella for a delicious combination.


    ๐ŸŒ Banana Nutella Donuts

    Add sliced banana with the Nutella filling.


    ๐Ÿซ Chocolate Glazed Version

    Top donuts with:

    • Chocolate glaze
    • Hazelnuts
    • Chocolate chips

    ๐Ÿฉ Baked Nutella Donuts

    Bake at:

    375ยฐF (190ยฐC) for 12โ€“15 minutes

    for a lighter version.


    โ˜• Coffee Shop Style

    Serve with:

    • Espresso
    • Cappuccino
    • Hot chocolate

    for a bakery-style treat.


    Flavor Upgrades / Secret Tips ๐Ÿ”ฅ

    โœ… Make sure milk is warm, not hot, so it doesnโ€™t kill the yeast.

    โœ… Donโ€™t add too much flourโ€”the dough should stay soft for fluffy donuts.

    โœ… Let donuts rise fully for a lighter texture.

    โœ… Fry at the correct temperature so they cook evenly.

    โœ… Warm Nutella slightly before filling for easier piping.

    โœ… Add a pinch of cinnamon sugar for extra flavor.


    Serving Ideas ๐Ÿฝ๏ธ

    Serve with:

    โ˜• Coffee
    ๐Ÿฅ› Cold milk
    ๐Ÿ“ Fresh berries
    ๐Ÿฆ Vanilla ice cream
    ๐Ÿซ Extra Nutella drizzle

    Perfect for:

    • Breakfast treats
    • Birthday parties
    • Brunch
    • Dessert tables
    • Holiday mornings

    Storage & Meal Prep Tips ๐Ÿฅก

    Room Temperature:

    Store in an airtight container for:

    1โ€“2 days

    Refrigerator:

    Store for:

    3โ€“4 days

    but allow them to come to room temperature before serving.

    Freezer:

    Freeze unfilled donuts for:

    up to 2 months

    Fill after thawing.

    Reheating:

    Warm in microwave for:

    10โ€“15 seconds

    to soften.


    Nutrition Facts (Approximate)

    Per donut:

    • Calories: 280โ€“380 kcal
    • Protein: 5โ€“7 g
    • Carbohydrates: 35โ€“45 g
    • Fat: 14โ€“20 g

    (Nutrition varies depending on size and amount of Nutella filling.)


    Frequently Asked Questions (Q&A)

    Q: Can I bake these instead of frying?
    A: Yes. They will be softer and less crispy but still delicious.

    Q: Can I use store-bought dough?
    A: Yes, refrigerated biscuit or donut dough can work for a quicker version.

    Q: How do I get a fluffy donut texture?
    A: Give the dough enough time to rise and avoid adding too much flour.

    Q: Can I fill donuts before frying?
    A: Itโ€™s best to fry first and fill afterward so the filling stays creamy.

    Q: Can I use another filling?
    A: Absolutely! Try pastry cream, jam, peanut butter, or caramel.


    Social Media Captions โค๏ธ

    Option 1 (Facebook Style)

    “Homemade Nutella Donuts are here! ๐Ÿฉ๐Ÿซ Soft, fluffy donuts filled with creamy chocolate hazelnut goodnessโ€”these taste like they came straight from a bakery.”

    Option 2 (Instagram Style)

    “The ultimate sweet treat ๐Ÿ˜๐Ÿซ Fluffy donuts + Nutella filling = pure happiness!”

    Option 3 (Short Viral Caption)

    “A donut filled with Nutella? Yes please! ๐Ÿฉโœจ”

    Option 4 (Homestyle Caption)

    “Some desserts are made to bring smiles โค๏ธ These homemade Nutella donuts are sweet, fluffy, and perfect for sharing with family and friends.”


    Final Food Description for Posting ๐Ÿด

    Nutella Donuts are soft, fluffy homemade donuts filled with creamy chocolate hazelnut spread and finished with a sweet sugar coating. Golden on the outside, tender on the inside, and filled with irresistible Nutella flavor, these bakery-style treats are perfect for breakfast, dessert, or any sweet craving. ๐Ÿฉ๐Ÿซโœจ

  • Chili Colorado

    Chili Colorado

    (Authentic Mexican Beef in Red Chile Sauce)

    Chile Colorado is a traditional Mexican dish made with tender chunks of beef slowly simmered in a rich red chile sauce made from dried chiles, garlic, onions, tomatoes, and warm spices. The name โ€œColoradoโ€ means โ€œcolored red,โ€ referring to the beautiful deep red chile sauce that gives this dish its signature flavor.

    This comforting recipe is perfect with warm tortillas, Mexican rice, beans, or stuffed into burritos and tacos.


    Full Recipe (Ingredients + Instructions)

    Ingredients

    For the Beef:

    • 3 pounds beef chuck roast, cut into 1ยฝ-inch cubes
    • 2 tablespoons vegetable oil
    • 1 teaspoon salt
    • 1 teaspoon black pepper
    • 1 teaspoon garlic powder
    • 1 teaspoon onion powder

    For the Red Chile Sauce:

    • 6 dried guajillo chiles
    • 3 dried ancho chiles
    • 2โ€“3 dried chile de รกrbol peppers (optional for heat)
    • 4 cups hot water
    • 5 garlic cloves
    • ยฝ large white onion
    • 2 Roma tomatoes
    • 2 teaspoons ground cumin
    • 1 teaspoon Mexican oregano
    • ยฝ teaspoon smoked paprika
    • 1 tablespoon apple cider vinegar
    • 1 teaspoon salt (adjust to taste)
    • 2 cups beef broth

    Optional Additions:

    • 2 potatoes, cubed
    • Fresh cilantro
    • Lime wedges
    • Diced onion
    • Queso fresco

    Instructions

    Step 1: Prepare the Chiles

    Remove stems and seeds from dried chiles.

    Toast chiles in a dry skillet for:

    20โ€“30 seconds

    until fragrant.

    Be careful not to burn them.

    Place chiles in hot water and soak for:

    15โ€“20 minutes

    until softened.


    Step 2: Make the Chile Sauce

    Blend together:

    • Softened chiles
    • Tomatoes
    • Onion
    • Garlic
    • Cumin
    • Oregano
    • Smoked paprika
    • Vinegar
    • Salt
    • Beef broth

    Blend until completely smooth.

    Strain the sauce through a fine mesh strainer for a silky texture.


    Step 3: Brown the Beef

    Season beef with:

    • Salt
    • Pepper
    • Garlic powder
    • Onion powder

    Heat oil in a large Dutch oven.

    Brown beef in batches until deeply golden.

    Remove and set aside.


    Step 4: Cook the Chile Colorado

    Add the red chile sauce to the same pot.

    Cook for:

    5โ€“10 minutes

    until slightly thickened and fragrant.

    Return beef to the pot.

    Add remaining beef broth.

    Bring to a simmer.

    Cover and cook:

    2ยฝโ€“3 hours

    until the beef is tender and the sauce is rich.


    Step 5: Add Potatoes (Optional)

    Add diced potatoes during the last:

    30โ€“40 minutes

    of cooking.

    Cook until tender.


    Step 6: Serve

    Garnish with:

    • Fresh cilantro
    • Diced onion
    • Lime juice

    Serve with warm tortillas.


    Extra Recipe Tips & Variations โœจ

    ๐ŸŒฏ Chile Colorado Burritos

    Fill flour tortillas with:

    • Chile Colorado beef
    • Refried beans
    • Cheese

    and smother with extra red chile sauce.


    ๐Ÿฅ” Chile Colorado con Papas

    Add potatoes for a traditional hearty version.


    ๐Ÿ– Pork Chile Colorado

    Replace beef with pork shoulder for another classic Mexican variation.


    ๐ŸŒถ๏ธ Extra Spicy Version

    Add:

    • More chile de รกrbol
    • Serrano peppers
    • Chipotle peppers

    for deeper heat.


    ๐Ÿš Bowl Style

    Serve over:

    • Mexican rice
    • Beans
    • Lettuce
    • Avocado

    for a filling meal.


    Flavor Upgrades / Secret Tips ๐Ÿ”ฅ

    โœ… Toast dried chiles lightly to bring out their smoky flavor.

    โœ… Strain the sauce for a smooth restaurant-style texture.

    โœ… Brown the beef wellโ€”the caramelized crust adds incredible depth.

    โœ… Slow cooking is the secret to tender, flavorful meat.

    โœ… Make it a day ahead; the flavors become even richer overnight.

    โœ… Add a small piece of Mexican chocolate for a deeper mole-like flavor (optional).


    Serving Ideas ๐Ÿฝ๏ธ

    Serve with:

    ๐ŸŒฎ Warm flour tortillas
    ๐Ÿš Mexican rice
    ๐Ÿซ˜ Refried beans
    ๐Ÿฅ‘ Guacamole
    ๐ŸŒฝ Corn tortillas
    ๐Ÿฅ— Fresh salad
    ๐Ÿง€ Queso fresco

    Perfect for:

    • Family dinners
    • Sunday meals
    • Mexican food nights
    • Meal prep
    • Holiday gatherings

    Storage & Meal Prep Tips ๐Ÿฅก

    Refrigerator:

    Store in an airtight container for:

    4โ€“5 days

    Freezer:

    Freeze Chile Colorado for:

    up to 3 months

    The flavor holds very well.

    Reheating:

    Warm slowly on the stovetop.

    Add a splash of beef broth if the sauce thickens too much.

    Meal Prep:

    Make a large batch and use leftovers for:

    • Burritos
    • Tacos
    • Enchiladas
    • Nachos

    Nutrition Facts (Approximate)

    Per serving:

    • Calories: 500โ€“650 kcal
    • Protein: 45โ€“55 g
    • Carbohydrates: 15โ€“25 g
    • Fat: 30โ€“40 g

    (Nutrition varies depending on beef cut and serving size.)


    Frequently Asked Questions (Q&A)

    Q: What does Chile Colorado mean?
    A: It means โ€œcolored redโ€ in Spanish, referring to the deep red chile sauce used in the dish.

    Q: What meat is traditionally used?
    A: Beef chuck roast is most common because it becomes tender during slow cooking.

    Q: Is Chile Colorado spicy?
    A: It can be mild or spicy depending on the dried chiles used. Guajillo and ancho give more flavor than heat.

    Q: Can I make it in a slow cooker?
    A: Yes. Brown the beef first, then cook on low for 7โ€“8 hours.

    Q: What is the difference between Chile Colorado and Carne Guisada?
    A: Chile Colorado is centered around a red chile sauce, while Carne Guisada is usually a thicker stew with tomatoes, vegetables, and spices.


    Social Media Captions โค๏ธ

    Option 1 (Facebook Style)

    “Tonightโ€™s dinner was homemade Chile Colorado ๐ŸŒถ๏ธ๐Ÿฅฉ Tender beef slow-cooked in a rich red chile sauce with authentic Mexican flavors. Comfort food at its best!”

    Option 2 (Instagram Style)

    “Slow cooked, bold flavors, and pure Mexican comfort ๐ŸŒถ๏ธโœจ Chile Colorado is a dish everyone needs to try!”

    Option 3 (Short Viral Caption)

    “Red chile magic in every bite ๐ŸŒถ๏ธ๐Ÿฅฉ๐Ÿ”ฅ”

    Option 4 (Homestyle Caption)

    “Some recipes are worth the time โค๏ธ This homemade Chile Colorado brings traditional Mexican flavor and family comfort straight to the table.”


    Final Food Description for Posting ๐Ÿด

    Chile Colorado is an authentic Mexican comfort dish featuring tender beef simmered slowly in a rich red chile sauce made with dried chiles, garlic, onions, tomatoes, and traditional spices. Deeply flavorful, slightly smoky, and incredibly satisfying, this classic recipe is perfect served with warm tortillas, rice, and beans for a true taste of Mexico. ๐ŸŒถ๏ธ๐Ÿฅฉโœจ