Category: RECIPES

  • Gorditas with Chicharrรณn and Cheese

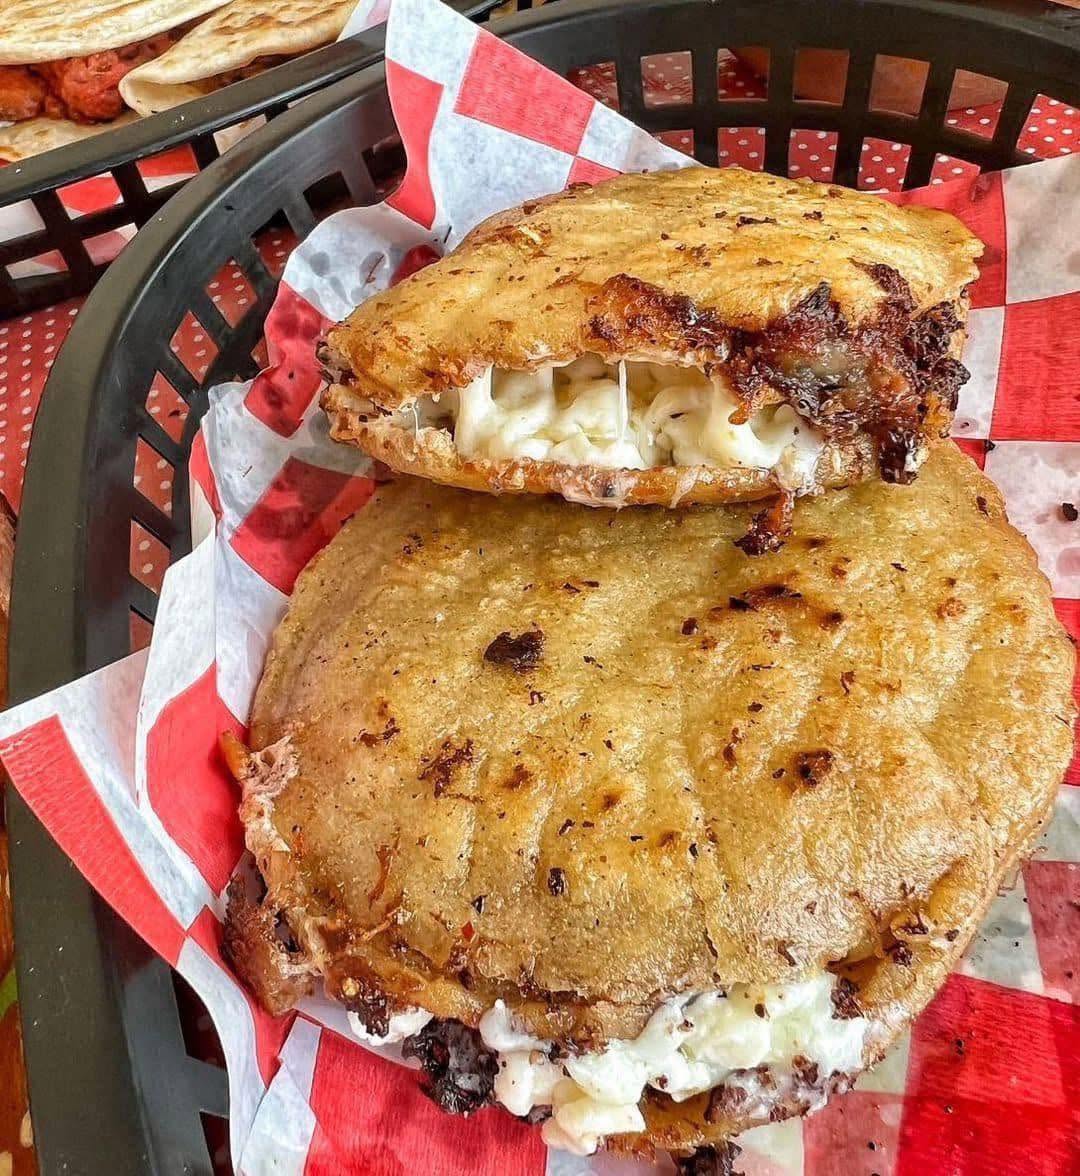
    Gorditas with Chicharrรณn and Cheese

    (Authentic Mexican Gorditas Filled with Chicharrรณn and Melted Cheese)

    These Gorditas with Chicharrรณn and Cheese are a classic Mexican favorite made with soft homemade masa pockets stuffed with flavorful chicharrรณn, gooey melted cheese, and your favorite toppings. Crispy on the outside and tender on the inside, they’re perfect for lunch, dinner, or a satisfying snack.


    Ingredients

    For the Gordita Dough:

    • 4 cups masa harina
    • 2ยฝโ€“3 cups warm water
    • 1 teaspoon salt
    • 2 tablespoons vegetable oil (optional, for a softer dough)

    For the Filling:

    • 2 cups chicharrรณn prensado or cooked pork cracklings, chopped
    • 2 cups shredded Oaxaca cheese
    • 1 cup shredded Monterey Jack cheese
    • 1 tablespoon vegetable oil
    • ยฝ medium onion, finely diced
    • 2 cloves garlic, minced
    • 1 cup salsa roja or salsa verde
    • 1 teaspoon cumin
    • ยฝ teaspoon smoked paprika
    • Black pepper to taste

    Optional Toppings:

    • Shredded lettuce
    • Diced tomatoes
    • Fresh cilantro
    • Diced white onion
    • Sour cream or Mexican crema
    • Crumbled queso fresco
    • Pickled jalapeรฑos
    • Avocado slices
    • Your favorite salsa

    Instructions

    Step 1: Prepare the Dough

    • In a large bowl, combine:
      • Masa harina
      • Salt
    • Slowly add warm water while mixing until a soft dough forms.
    • Knead for 3โ€“5 minutes until smooth.
    • Cover with a damp towel and let rest for 15โ€“20 minutes.

    Step 2: Cook the Chicharrรณn Filling

    • Heat oil in a skillet over medium heat.
    • Cook onion until softened.
    • Add garlic and cook for 30 seconds.
    • Stir in the chopped chicharrรณn.
    • Add salsa, cumin, smoked paprika, and black pepper.
    • Simmer for 5โ€“8 minutes until heated through.

    Step 3: Form the Gorditas

    • Divide dough into 10โ€“12 equal balls.
    • Flatten each into a disc about ยฝ inch thick.

    Cook on a hot griddle or skillet for 3โ€“4 minutes per side until lightly browned and cooked through.


    Step 4: Stuff the Gorditas

    • Let the gorditas cool for 2โ€“3 minutes.
    • Slice each one open, creating a pocket without cutting all the way through.

    Fill with:

    • Chicharrรณn mixture
    • Oaxaca cheese
    • Monterey Jack cheese

    Return to the skillet for 1โ€“2 minutes until the cheese melts.


    Step 5: Serve

    Top with:

    ๐ŸŒฟ Cilantro
    ๐Ÿง… Diced onion
    ๐Ÿฅฌ Lettuce
    ๐Ÿ… Tomatoes
    ๐Ÿฅ‘ Avocado
    ๐Ÿง€ Queso fresco
    ๐Ÿฅ„ Sour cream

    Serve immediately with salsa and lime wedges.


    Extra Recipe Tips & Secrets ๐ŸŒฎโœจ

    โœ… Keep the dough moist
    Cover unused dough with a damp towel to prevent drying.

    โœ… Use fresh masa harina
    It gives the gorditas the best flavor and texture.

    โœ… Don’t overfill
    Too much filling can cause the gorditas to split.

    โœ… Toast after filling
    A quick return to the skillet creates a crispy exterior and perfectly melted cheese.


    Delicious Variations

    ๐ŸŒถ๏ธ Green Chile Gorditas

    Add:

    • Roasted Hatch green chiles
    • Pepper Jack cheese

    ๐Ÿฅฉ Carne Asada Gorditas

    Replace chicharrรณn with:

    • Grilled steak
    • Oaxaca cheese
    • Pico de gallo

    ๐Ÿ— Chicken Gorditas

    Fill with:

    • Shredded chicken
    • Salsa verde
    • Monterey Jack cheese

    ๐Ÿซ˜ Bean & Cheese Gorditas

    Fill with:

    • Refried beans
    • Oaxaca cheese
    • Queso fresco

    ๐Ÿ”ฅ Spicy Gorditas

    Add:

    • Jalapeรฑos
    • Serrano peppers
    • Hot salsa roja

    Serving Ideas

    Serve with:

    ๐Ÿš Mexican rice
    ๐Ÿซ˜ Refried beans
    ๐ŸŒฝ Mexican street corn
    ๐Ÿฅ‘ Guacamole
    ๐ŸŒถ๏ธ Salsa verde
    ๐Ÿฅ— Fresh salad


    Storage & Meal Prep

    Refrigerator:
    Store leftovers for up to 3 days.

    Freezer:
    Freeze cooked gorditas (without toppings) for up to 2 months.

    Reheating:
    Warm in a skillet over medium heat until heated through and crispy.


    Social Media Caption Ideas โค๏ธ

    Option 1:

    “Made these Gorditas with Chicharrรณn and Cheese and they were absolutely delicious! ๐ŸŒฎ๐Ÿง€ Crispy homemade masa stuffed with savory pork and gooey melted cheeseโ€”every bite is packed with flavor.
    Full recipe is in the comments below!”


    Option 2:

    “Homemade gorditas are always worth it! ๐Ÿ˜๐ŸŒฎ Soft masa pockets filled with flavorful chicharrรณn, melted cheese, and fresh toppings make the ultimate comfort food.
    Save this recipe โค๏ธ
    Recipe below!”


    Option 3:

    “Golden homemade gorditas stuffed with chicharrรณn and lots of cheeseโ€ฆ what could be better? ๐Ÿ”ฅ๐Ÿง€ Perfect for lunch, dinner, or your next Mexican-inspired feast!
    Who would grab one? ๐Ÿ‘‡
    Full recipe in the comments!”


    Nutrition Facts (Approximate)

    Per gordita (if recipe makes 10):

    • Calories: 380โ€“480 kcal
    • Protein: 15โ€“20 g
    • Carbohydrates: 30โ€“35 g
    • Fat: 22โ€“28 g
    • Fiber: 3โ€“5 g

    Entire Recipe:

    • Calories: approximately 3,800โ€“4,800 kcal
    • Protein: approximately 150โ€“200 g

    Frequently Asked Questions (Q&A)

    Q: What is chicharrรณn prensado?
    A: It’s seasoned pressed pork cracklings that become tender when cooked in salsa, making them a traditional gordita filling.

    Q: Can I use regular pork cracklings?
    A: Yes, but simmer them in salsa first so they soften and absorb flavor.

    Q: What cheese is best for gorditas?
    A: Oaxaca cheese is the traditional choice because it melts beautifully, but Monterey Jack or mozzarella also work well.

    Q: Can I make the dough ahead of time?
    A: Yes! Keep it covered in the refrigerator for up to 24 hours before cooking.

    Q: Can I cook gorditas on a grill?
    A: A flat griddle or cast-iron skillet gives the best texture, but a grill with a flat-top insert also works.

    Q: Can I freeze cooked gorditas?
    A: Yes! Freeze them without fresh toppings, then reheat in a skillet for the best results.


    ๐ŸŒฎ๐Ÿง€๐Ÿท Gorditas with Chicharrรณn and Cheese are a true Mexican comfort foodโ€”soft homemade masa filled with savory pork, melted cheese, and fresh toppings for an unforgettable meal! โค๏ธ

  • Cheesy Taco Spaghetti

    (Mexican-Inspired Beef Taco Pasta Bake)

    This Cheesy Taco Spaghetti combines the bold flavors of tacos with the comfort of a creamy pasta dish. Seasoned ground beef, tender spaghetti, taco spices, salsa, and lots of melted cheese come together in one easy family-friendly dinner!


    Ingredients

    For the Taco Spaghetti:

    • 1 pound ground beef
    • 12 oz spaghetti noodles
    • 1 tablespoon olive oil
    • 1 medium onion, diced
    • 4 cloves garlic, minced
    • 1 packet taco seasoning (or homemade seasoning)
    • 1 can (10 oz) diced tomatoes with green chiles
    • 1 cup salsa
    • 1 cup beef broth
    • 8 oz cream cheese, softened
    • 1 cup sour cream
    • 2 cups shredded cheddar cheese
    • 1 cup shredded Monterey Jack cheese

    Homemade Taco Seasoning:

    • 2 teaspoons chili powder
    • 1 teaspoon cumin
    • 1 teaspoon paprika
    • 1 teaspoon garlic powder
    • 1 teaspoon onion powder
    • ยฝ teaspoon oregano
    • ยฝ teaspoon salt
    • ยฝ teaspoon black pepper

    Optional Additions:

    • 1 cup corn
    • 1 can black beans, drained
    • 1 chopped jalapeรฑo
    • 1 cup roasted Hatch green chiles
    • Crispy bacon pieces
    • Bell peppers
    • Green onions
    • Fresh cilantro

    Instructions

    Step 1: Cook the Spaghetti

    • Bring a large pot of salted water to a boil.
    • Cook spaghetti according to package directions until al dente.
    • Drain and set aside.

    Step 2: Prepare the Taco Meat

    • Heat olive oil in a large skillet.
    • Add ground beef and cook until browned.
    • Drain excess grease.

    Add:

    • Onion
    • Garlic

    Cook for 2โ€“3 minutes.

    Stir in:

    • Taco seasoning
    • Tomatoes with green chiles
    • Salsa
    • Beef broth

    Simmer for 5โ€“10 minutes.


    Step 3: Make It Creamy

    Reduce heat.

    Add:

    • Cream cheese
    • Sour cream

    Stir until melted and smooth.


    Step 4: Combine Everything

    Add cooked spaghetti to the taco sauce.

    Mix until every strand is coated.

    Stir in:

    • 1 cup cheddar cheese
    • ยฝ cup Monterey Jack cheese

    Step 5: Bake (Optional)

    Transfer to a greased baking dish.

    Top with remaining cheese.

    Bake:

    375ยฐF (190ยฐC) for 15โ€“20 minutes

    until cheese is melted and bubbly.


    Topping Ideas ๐ŸŒฎโœจ

    Finish with:

    • Fresh cilantro
    • Diced tomatoes
    • Green onions
    • Jalapeรฑos
    • Sour cream
    • Avocado
    • Salsa
    • Crushed tortilla chips

    Extra Recipe Tips & Secrets ๐Ÿง€๐Ÿ”ฅ

    For the Best Taco Spaghetti:

    โœ… Use freshly shredded cheese
    It melts smoother than pre-shredded cheese.

    โœ… Cook pasta al dente
    It prevents mushy noodles after baking.

    โœ… Add a little pasta water
    It helps create a silky sauce.

    โœ… Let it rest before serving
    The flavors settle and the sauce thickens.


    Delicious Variations

    ๐ŸŒถ๏ธ Green Chile Taco Spaghetti:

    Add:

    • Hatch green chiles
    • Pepper Jack cheese
    • Extra cumin

    ๐Ÿฅ“ Bacon Cheeseburger Taco Spaghetti:

    Add:

    • Crispy bacon
    • Extra cheddar
    • Pickles on top

    ๐Ÿ— Chicken Taco Spaghetti:

    Replace beef with:

    • Shredded chicken
    • Rotisserie chicken

    ๐ŸŒฝ Southwest Taco Spaghetti:

    Add:

    • Corn
    • Black beans
    • Bell peppers

    ๐Ÿ”ฅ Spicy Version:

    Add:

    • Jalapeรฑos
    • Serrano peppers
    • Hot salsa

    Serving Ideas

    Serve with:

    ๐Ÿฅ— Fresh salad
    ๐ŸŒฝ Mexican street corn
    ๐Ÿฅ‘ Guacamole
    ๐Ÿซ˜ Refried beans
    ๐ŸŒฎ Tortilla chips
    ๐ŸŒถ๏ธ Salsa verde


    Storage & Meal Prep

    Refrigerator:
    Store in an airtight container for up to 4 days.

    Freezer:
    Freeze for up to 3 months.

    Reheating:
    Warm on the stove or microwave with a splash of milk or broth.


    Social Media Caption Ideas โค๏ธ

    Option 1:

    “Made this Cheesy Taco Spaghetti and it was a family favorite! ๐ŸŒฎ๐Ÿง€๐Ÿ All the flavors of tacos combined with creamy, cheesy pasta for the ultimate comfort meal.
    Full recipe is in the comments below!”


    Option 2:

    “Taco night just got a delicious twist! ๐Ÿ˜๐ŸŒฎ This Cheesy Taco Spaghetti is creamy, loaded with seasoned beef, and covered in melted cheese. Easy, comforting, and absolutely delicious!
    Save this recipe โค๏ธ
    Recipe below!”


    Option 3:

    “When tacos meet pastaโ€ฆ magic happens! ๐Ÿ”ฅ๐Ÿ๐Ÿง€ This cheesy taco spaghetti is packed with bold Mexican flavors and cheesy goodness in every bite. Perfect for busy weeknights!
    Who would try this? ๐Ÿ‘‡
    Full recipe in the comments!”


    Nutrition Facts (Approximate)

    Per serving (if divided into 8 servings):

    • Calories: 500โ€“650 kcal
    • Protein: 25โ€“35 g
    • Carbohydrates: 55โ€“70 g
    • Fat: 25โ€“35 g
    • Fiber: 4โ€“6 g

    Entire Recipe:

    • Calories: approximately 4,000โ€“5,200 kcal
    • Protein: approximately 200โ€“280 g

    Frequently Asked Questions (Q&A)

    Q: Can I use ground turkey instead of beef?
    A: Yes! Ground turkey works great and makes a lighter version.

    Q: Can I make taco spaghetti ahead of time?
    A: Yes! Assemble it, refrigerate, and bake when ready.

    Q: What cheese melts best?
    A: Monterey Jack, cheddar, Oaxaca, and Pepper Jack are great choices.

    Q: Can I make it spicy?
    A: Add hot salsa, jalapeรฑos, or green chiles.

    Q: Can I use another pasta shape?
    A: Yes! Rotini, penne, or shells work perfectly.

    Q: Is this recipe freezer-friendly?
    A: Yes! Freeze in portions for easy future meals.


    ๐ŸŒฎ๐Ÿง€๐Ÿ Cheesy Taco Spaghetti is the perfect mashup of two favorites โ€” classic tacos and creamy pasta โ€” creating an easy, cheesy, and flavorful dinner the whole family will love! โค๏ธ

  • Cilantro Lime Rice

    (Fresh Mexican-Style Cilantro Lime Rice)

    This Cilantro Lime Rice is a bright, flavorful, and easy side dish made with fluffy rice, fresh lime juice, and fragrant cilantro. Itโ€™s the perfect addition to tacos, burrito bowls, grilled meats, enchiladas, and any Mexican-inspired meal.


    Ingredients

    For the Rice:

    • 2 cups long-grain white rice
    • 3 cups chicken broth or water
    • 1 tablespoon olive oil or butter
    • 3 cloves garlic, minced
    • ยฝ small onion, finely diced
    • 1 teaspoon salt
    • 1 bay leaf (optional)

    For the Cilantro Lime Flavor:

    • ยฝ cup fresh cilantro, finely chopped
    • Juice of 3 fresh limes
    • 1 teaspoon lime zest
    • ยฝ teaspoon black pepper
    • ยฝ teaspoon cumin (optional)

    Optional Additions:

    • 1 diced jalapeรฑo
    • ยฝ cup corn kernels
    • ยฝ cup black beans
    • Green onions
    • Chopped green chiles
    • Queso fresco
    • Avocado pieces

    Instructions

    Step 1: Prepare the Rice

    • Rinse rice under cold water until water runs mostly clear.
    • Drain well.

    Step 2: Sautรฉ Aromatics

    • Heat olive oil or butter in a saucepan.
    • Add onion and cook for 2โ€“3 minutes.
    • Add garlic and cook for 30 seconds.

    Step 3: Cook the Rice

    Add:

    • Rice
    • Chicken broth or water
    • Salt
    • Bay leaf

    Bring to a boil.

    Reduce heat to low, cover, and simmer for:

    18โ€“20 minutes until rice is tender.


    Step 4: Add Cilantro & Lime

    • Remove from heat.
    • Let rice rest covered for 5 minutes.
    • Fluff with a fork.

    Mix in:

    • Cilantro
    • Lime juice
    • Lime zest
    • Black pepper
    • Cumin

    Taste and adjust seasoning.


    Step 5: Serve

    Garnish with:

    ๐ŸŒฟ Extra cilantro
    ๐Ÿ‹ Lime wedges
    ๐ŸŒถ๏ธ Jalapeรฑo slices
    ๐Ÿฅ‘ Avocado

    Serve warm!


    Extra Recipe Tips & Secrets ๐ŸŒฟโœจ

    For Perfect Cilantro Lime Rice:

    โœ… Rinse the rice
    Removes extra starch and keeps it fluffy.

    โœ… Use fresh lime juice
    It gives the best bright flavor.

    โœ… Add cilantro at the end
    This keeps the fresh green flavor.

    โœ… Use broth instead of water
    It creates a richer taste.


    Delicious Variations

    ๐ŸŒถ๏ธ Green Chile Cilantro Rice:

    Add:

    • Roasted Hatch green chiles
    • Extra cilantro
    • Lime zest

    ๐Ÿง€ Cheesy Cilantro Lime Rice:

    Add:

    • Monterey Jack cheese
    • Queso fresco

    ๐Ÿฅ‘ Avocado Lime Rice:

    Add:

    • Mashed avocado
    • Extra lime juice

    ๐Ÿ— Chicken Cilantro Lime Rice Bowl:

    Top with:

    • Grilled chicken
    • Salsa
    • Beans
    • Corn

    ๐ŸŒฝ Mexican Street Corn Rice:

    Add:

    • Roasted corn
    • Cotija cheese
    • Chili powder
    • Lime

    Serving Ideas ๐ŸŒฎ

    Perfect with:

    ๐Ÿฅฉ Carne Asada
    ๐ŸŒฎ Street Tacos
    ๐ŸŒฏ Burritos
    ๐Ÿ— Chicken Enchiladas
    ๐ŸŒถ๏ธ Green Chile Stew
    ๐Ÿฒ Steak Posole
    ๐Ÿซ˜ Pinto Beans
    ๐Ÿฅ‘ Guacamole


    Storage & Meal Prep

    Refrigerator:
    Store in an airtight container for up to 5 days.

    Freezer:
    Freeze for up to 3 months.

    Reheating:
    Add a splash of water or broth before warming.


    Social Media Caption Ideas โค๏ธ

    Option 1:

    “Made this Cilantro Lime Rice and it was the perfect side dish! ๐ŸŒฟ๐Ÿ‹๐Ÿš Fluffy rice, fresh cilantro, and bright lime flavor make this recipe amazing with tacos, bowls, and grilled meats.
    Full recipe is in the comments below!”


    Option 2:

    “Restaurant-style rice made right at home! ๐Ÿ˜๐ŸŒฟ This Cilantro Lime Rice is fresh, flavorful, and so easy to make. The perfect addition to any Mexican-inspired dinner.
    Save this recipe โค๏ธ
    Recipe below!”


    Option 3:

    “Simple ingredients, BIG flavor! ๐Ÿ‹๐ŸŒฟ This homemade Cilantro Lime Rice is fluffy, fresh, and packed with delicious citrus flavor. Perfect for taco night or meal prep!
    Who would add this to their dinner? ๐Ÿ‘‡
    Full recipe in the comments!”


    Nutrition Facts (Approximate)

    Per serving (if divided into 8 servings):

    • Calories: 180โ€“230 kcal
    • Protein: 3โ€“5 g
    • Carbohydrates: 35โ€“45 g
    • Fat: 4โ€“7 g
    • Fiber: 1โ€“2 g

    Entire Recipe:

    • Calories: approximately 1,500โ€“1,800 kcal
    • Protein: approximately 25โ€“40 g

    Frequently Asked Questions (Q&A)

    Q: Can I use brown rice?
    A: Yes! Increase cooking time because brown rice takes longer.

    Q: Can I make this without cilantro?
    A: Yes, but it will become more like a lime rice instead.

    Q: How do I make it taste like restaurant rice?
    A: Use chicken broth, garlic, fresh lime zest, and finish with fresh cilantro.

    Q: Can I make it ahead of time?
    A: Yes! It reheats very well for meal prep.

    Q: What rice works best?
    A: Long-grain white rice, jasmine rice, or basmati rice all work well.

    Q: Can I add spice?
    A: Add jalapeรฑos, serranos, or roasted green chiles.


    ๐ŸŒฟ๐Ÿ‹๐Ÿš Cilantro Lime Rice is a fresh and flavorful side dish that brings bright citrus, herbs, and fluffy rice together โ€” the perfect match for tacos, enchiladas, carne asada, and all your favorite Mexican meals! โค๏ธ

  • Green Chile And Cheese Quiche

    (Creamy Hatch Green Chile Cheese Quiche)

    This Green Chile and Cheese Quiche is a delicious Southwestern twist on a classic breakfast favorite. Made with roasted green chiles, creamy eggs, and plenty of melted cheese, this quiche is perfect for breakfast, brunch, lunch, or an easy dinner. Itโ€™s rich, comforting, and packed with bold Hatch green chile flavor!


    Ingredients

    For the Quiche:

    • 1 refrigerated pie crust (or homemade crust)
    • 6 large eggs
    • 1ยฝ cups half-and-half or heavy cream
    • 2 cups shredded Monterey Jack cheese
    • 1 cup shredded cheddar cheese
    • 1 cup roasted Hatch green chiles, chopped
    • ยฝ medium onion, finely diced
    • 2 cloves garlic, minced
    • ยฝ cup sour cream
    • 1 teaspoon salt
    • ยฝ teaspoon black pepper
    • 1 teaspoon cumin
    • 1 teaspoon smoked paprika
    • ยฝ teaspoon Mexican oregano

    Optional Additions:

    • 6 slices cooked bacon, crumbled
    • 1 cup cooked breakfast sausage
    • 1 cup diced ham
    • Fresh cilantro
    • Jalapeรฑo slices
    • Green onions
    • Queso fresco

    Instructions

    Step 1: Prepare the Crust

    • Preheat oven to 375ยฐF (190ยฐC).
    • Place pie crust into a 9-inch pie dish.
    • Prick the bottom with a fork.
    • Bake for 8โ€“10 minutes to prevent a soggy crust.

    Step 2: Prepare the Green Chile Filling

    • Heat a skillet over medium heat.
    • Add onion and cook for 3โ€“4 minutes until softened.
    • Add garlic and cook for 30 seconds.
    • Stir in chopped Hatch green chiles.
    • Cook for another 2 minutes.

    Step 3: Make the Egg Mixture

    In a large bowl whisk together:

    • Eggs
    • Half-and-half
    • Sour cream
    • Salt
    • Pepper
    • Cumin
    • Smoked paprika
    • Mexican oregano

    Mix until smooth.


    Step 4: Assemble the Quiche

    Layer into the crust:

    1. Green chile mixture
    2. Monterey Jack cheese
    3. Cheddar cheese
    4. Egg mixture

    Top with extra cheese if desired.


    Step 5: Bake

    • Bake at 375ยฐF (190ยฐC) for 35โ€“45 minutes.
    • The center should be set but still slightly soft.
    • Let rest for 10 minutes before slicing.

    Step 6: Serve

    Serve warm with:

    • Salsa verde
    • Sour cream
    • Fresh cilantro
    • Avocado slices
    • Fresh fruit
    • Side salad

    Extra Recipe Tips & Secrets ๐ŸŒถ๏ธโœจ

    For the Best Green Chile Quiche:

    โœ… Roast your green chiles
    Roasted Hatch chiles add a smoky, authentic flavor.

    โœ… Use freshly shredded cheese
    It melts smoother and gives a better texture.

    โœ… Let the quiche rest
    It helps the filling set and makes cleaner slices.

    โœ… Donโ€™t overbake
    Overcooking can make the eggs rubbery.


    Delicious Variations

    ๐Ÿฅ“ Bacon Green Chile Quiche:

    Add:

    • Crispy bacon
    • Extra cheddar cheese

    ๐ŸŒญ Sausage Green Chile Quiche:

    Add:

    • Breakfast sausage
    • Pepper Jack cheese

    ๐Ÿ— Chicken Green Chile Quiche:

    Add:

    • Shredded chicken
    • Green chile sauce

    ๐ŸŒฝ Southwest Corn Quiche:

    Add:

    • Corn
    • Black beans
    • Cilantro
    • Cotija cheese

    ๐Ÿง€ Extra Cheesy Version:

    Use:

    • Oaxaca cheese
    • Monterey Jack
    • Pepper Jack

    Serving Ideas ๐ŸŒฎ

    Perfect with:

    ๐Ÿฅ‘ Guacamole
    ๐ŸŒถ๏ธ Salsa verde
    ๐Ÿž Homemade tortillas
    ๐Ÿฅ“ Bacon
    ๐Ÿ“ Fresh fruit
    โ˜• Coffee or tea


    Storage & Meal Prep

    Refrigerator:
    Store covered for up to 4 days.

    Freezer:
    Freeze slices individually for up to 3 months.

    Reheating:
    Warm in the oven at 350ยฐF until heated through.


    Social Media Caption Ideas โค๏ธ

    Option 1:

    “Made this Green Chile and Cheese Quiche and it was amazing! ๐ŸŒถ๏ธ๐Ÿง€ Creamy eggs, roasted Hatch green chiles, and lots of melted cheese come together for the perfect breakfast or brunch recipe.
    Full recipe is in the comments below!”


    Option 2:

    “If you love green chile, you need this quiche! ๐Ÿ˜๐ŸŒถ๏ธ Loaded with roasted peppers, cheesy goodness, and Southwest flavors in every bite. Perfect for breakfast, brunch, or an easy dinner.
    Save this recipe โค๏ธ
    Recipe below!”


    Option 3:

    “Breakfast just got better! ๐Ÿฅš๐Ÿง€๐ŸŒถ๏ธ This Green Chile Cheese Quiche is creamy, flavorful, and packed with bold Hatch chile flavor. A family favorite that disappears fast!
    Who would try a slice? ๐Ÿ‘‡
    Full recipe in the comments!”


    Nutrition Facts (Approximate)

    Per slice (if cut into 8 slices):

    • Calories: 350โ€“450 kcal
    • Protein: 18โ€“25 g
    • Carbohydrates: 15โ€“25 g
    • Fat: 25โ€“35 g
    • Fiber: 2โ€“3 g

    Entire Quiche:

    • Calories: approximately 2,800โ€“3,600 kcal
    • Protein: approximately 140โ€“190 g

    Frequently Asked Questions (Q&A)

    Q: What green chiles are best for this quiche?
    A: Hatch green chiles are ideal because they have a smoky flavor, but canned green chiles also work.

    Q: Can I make this without a crust?
    A: Yes! Bake it as a crustless quiche for a lower-carb option.

    Q: Can I prepare it ahead of time?
    A: Absolutely! Bake it the day before and reheat before serving.

    Q: How do I know when quiche is done?
    A: The center should be set with a slight jiggle, not liquid.

    Q: Can I add meat?
    A: Yes! Bacon, sausage, ham, or chicken are delicious additions.

    Q: Can I make it spicy?
    A: Add jalapeรฑos, serranos, or hot Hatch green chiles.


    ๐ŸŒถ๏ธ๐Ÿง€๐Ÿฅš Green Chile and Cheese Quiche is the perfect blend of creamy eggs, smoky peppers, and melted cheese โ€” a delicious Southwest-inspired recipe thatโ€™s perfect for any meal of the day! โค๏ธ

  • Carne Asada Marinade

    Carne Asada Marinade

    (Authentic Mexican-Style Steak Marinade)

    This Carne Asada Marinade creates juicy, flavorful, and tender grilled steak with bold Mexican flavors. Made with fresh citrus, garlic, herbs, and spices, this marinade is perfect for tacos, burritos, quesadillas, nachos, or a classic carne asada plate.


    Ingredients

    For the Marinade:

    • ยฝ cup fresh orange juice
    • ยผ cup fresh lime juice
    • ยผ cup olive oil
    • ยผ cup chopped fresh cilantro
    • 6 cloves garlic, minced
    • 2 tablespoons soy sauce
    • 2 tablespoons white vinegar
    • 1โ€“2 jalapeรฑos, finely chopped (optional)
    • 1 tablespoon Worcestershire sauce

    Seasonings:

    • 2 teaspoons ground cumin
    • 2 teaspoons chili powder
    • 1 teaspoon smoked paprika
    • 1 teaspoon Mexican oregano
    • 1 teaspoon salt
    • 1 teaspoon black pepper
    • ยฝ teaspoon onion powder
    • ยฝ teaspoon garlic powder

    Best Cuts of Meat:

    Use:

    ๐Ÿฅฉ Skirt steak (traditional)
    ๐Ÿฅฉ Flank steak
    ๐Ÿฅฉ Sirloin flap meat
    ๐Ÿฅฉ Thin-cut steak


    Instructions

    Step 1: Make the Marinade

    In a large bowl combine:

    • Orange juice
    • Lime juice
    • Olive oil
    • Cilantro
    • Garlic
    • Soy sauce
    • Vinegar
    • Worcestershire sauce
    • Jalapeรฑos

    Mix well.


    Step 2: Add Seasonings

    Stir in:

    • Cumin
    • Chili powder
    • Smoked paprika
    • Mexican oregano
    • Salt
    • Pepper
    • Onion powder
    • Garlic powder

    Mix until fully combined.


    Step 3: Marinate the Steak

    • Place steak in a large resealable bag or container.
    • Pour marinade over the meat.
    • Cover and refrigerate.

    Marinating Time:

    โœ… Minimum: 2 hours
    โœ… Best flavor: 8โ€“12 hours
    โœ… Maximum: 24 hours


    Step 4: Grill the Carne Asada

    • Remove steak from marinade.
    • Let it sit at room temperature for 20โ€“30 minutes.
    • Heat grill or cast iron skillet to high heat.
    • Cook:

    Skirt steak:

    • 3โ€“5 minutes per side for medium-rare

    Flank steak:

    • 5โ€“7 minutes per side

    Step 5: Rest & Slice

    • Rest meat for 5โ€“10 minutes.
    • Slice thinly against the grain.

    Serve immediately!


    Serving Ideas ๐ŸŒฎ

    Perfect for:

    ๐ŸŒฎ Street tacos
    ๐ŸŒฏ Burritos
    ๐Ÿฅ‘ Carne asada bowls
    ๐Ÿง€ Quesadillas
    ๐Ÿš Mexican rice plates
    ๐Ÿฅ— Salads
    ๐Ÿ”ฅ Grilled steak platters

    Top with:

    • Diced onion
    • Fresh cilantro
    • Salsa verde
    • Guacamole
    • Lime wedges
    • Cotija cheese

    Extra Recipe Tips & Secrets ๐Ÿ”ฅ

    For the Best Carne Asada:

    โœ… Fresh citrus is important
    Orange and lime tenderize and add bright flavor.

    โœ… Donโ€™t over-marinate
    Too much acid can change the texture of the meat.

    โœ… Cook over high heat
    A hot grill creates the perfect char.

    โœ… Slice against the grain
    This makes the steak tender and easier to chew.


    Delicious Variations

    ๐ŸŒถ๏ธ Spicy Carne Asada:

    Add:

    • Serrano peppers
    • Chipotle peppers
    • Hot sauce
    • Extra chili powder

    ๐Ÿง„ Garlic Loverโ€™s Marinade:

    Add:

    • Extra garlic
    • Roasted garlic paste

    ๐Ÿบ Beer Carne Asada:

    Replace some orange juice with:

    • Mexican lager beer

    ๐ŸŒฟ Cilantro Lime Version:

    Add:

    • Extra cilantro
    • Lime zest

    ๐Ÿฅ“ Smoky BBQ Carne Asada:

    Add:

    • Smoked paprika
    • BBQ seasoning

    Storage

    Marinade:
    Store unused marinade in the refrigerator for up to 3 days.

    Cooked Carne Asada:
    Keep refrigerated for up to 4 days.

    Freezer:
    Freeze cooked steak for up to 3 months.


    Social Media Caption Ideas โค๏ธ

    Option 1:

    “Made this Carne Asada Marinade and the flavor was incredible! ๐Ÿฅฉ๐Ÿ”ฅ Fresh citrus, garlic, cilantro, and spices come together to create the perfect juicy grilled steak. Perfect for tacos, burritos, or a family dinner!
    Full recipe is in the comments below!”


    Option 2:

    “The secret to amazing carne asada starts with the marinade! ๐ŸŒฎ๐Ÿ”ฅ This recipe makes steak tender, juicy, and packed with authentic Mexican flavor. One bite and youโ€™ll never go back to plain steak!
    Save this recipe โค๏ธ
    Recipe below!”


    Option 3:

    “Taco night just got better! ๐Ÿ˜๐Ÿฅฉ This Carne Asada Marinade creates the perfect smoky, citrusy, flavorful steak for homemade tacos. Simple ingredients, BIG flavor!
    Who would love a plate of this? ๐Ÿ‘‡
    Full recipe in the comments!”


    Option 4:

    “Nothing beats homemade carne asada! ๐Ÿ”ฅ๐ŸŒฎ A good marinade transforms simple steak into something amazing. Fresh lime, orange, garlic, and spices make every bite unforgettable.
    Check the comments for the full recipe!”


    Nutrition Facts (Approximate)

    For marinated grilled steak (6 oz serving):

    • Calories: 350โ€“450 kcal
    • Protein: 45โ€“55 g
    • Carbohydrates: 3โ€“8 g
    • Fat: 15โ€“25 g
    • Fiber: 1 g

    Entire Marinade:

    • Calories: approximately 400โ€“600 kcal
    • Protein: 2โ€“5 g

    Frequently Asked Questions (Q&A)

    Q: What is the best meat for carne asada?
    A: Skirt steak is traditional, but flank steak and flap meat are excellent choices.

    Q: How long should I marinate carne asada?
    A: For the best flavor, marinate 8โ€“12 hours.

    Q: Can I freeze steak in the marinade?
    A: Yes! Freeze raw steak with marinade for up to 3 months.

    Q: Can I cook carne asada without a grill?
    A: Yes! A cast iron skillet works great.

    Q: Why add orange juice?
    A: Orange juice adds sweetness, acidity, and helps tenderize the meat.

    Q: Can I make this marinade ahead?
    A: Yes! Prepare it a day before and keep refrigerated.

    Q: What makes carne asada taste authentic?
    A: The combination of citrus, garlic, cilantro, chiles, and high-heat grilling creates the classic Mexican flavor.


    ๐Ÿฅฉ๐Ÿ”ฅ๐ŸŒฎ Carne Asada Marinade is the secret to juicy, flavorful steak with smoky grilled edges and fresh Mexican flavors โ€” perfect for taco nights, backyard BBQs, and family gatherings! โค๏ธ

  • Double Hatch Green Chile and Double Sausage

    Double Hatch Green Chile and Double Sausage

    (Smoky, Spicy Hatch Chile Sausage Skillet)

    This Double Hatch Green Chile & Double Sausage recipe is loaded with bold Southwest flavors! Juicy sausage, roasted Hatch green chiles, onions, garlic, and melted cheese come together for a hearty dish that works for breakfast, lunch, or dinner. Serve it in tortillas, over rice, or enjoy it straight from the skillet.


    Ingredients

    For the Sausage & Green Chile Mixture:

    • 2 pounds sausage (use a combination of:
      • 1 pound breakfast sausage
      • 1 pound smoked sausage or chorizo)
    • 3 cups roasted Hatch green chiles, chopped
    • 1 large onion, diced
    • 5 cloves garlic, minced
    • 1 bell pepper, diced
    • 2 tablespoons olive oil or butter
    • 1 teaspoon cumin
    • 1 teaspoon smoked paprika
    • 1 teaspoon Mexican oregano
    • 1 teaspoon garlic powder
    • 1 teaspoon onion powder
    • ยฝ teaspoon black pepper
    • Salt to taste

    Cheese & Extras:

    • 2 cups shredded Monterey Jack cheese
    • 1 cup shredded cheddar cheese
    • ยฝ cup queso fresco (optional)
    • ยผ cup chopped cilantro
    • Juice of 1 lime

    Optional Additions:

    • 4 scrambled eggs (breakfast style)
    • 2 cups diced potatoes
    • 1 can pinto beans
    • Corn kernels
    • Jalapeรฑos
    • Bacon pieces
    • Green chile sauce

    Instructions

    Step 1: Cook the Sausage

    • Heat a large skillet over medium heat.
    • Add sausage and cook until browned.
    • Break it into small pieces as it cooks.
    • Drain excess grease if needed.

    Step 2: Add Vegetables

    Add:

    • Onion
    • Bell pepper
    • Garlic

    Cook for 4โ€“5 minutes until softened.


    Step 3: Add Hatch Green Chile

    Stir in:

    • Roasted Hatch green chiles
    • Cumin
    • Smoked paprika
    • Mexican oregano
    • Garlic powder
    • Onion powder
    • Black pepper

    Cook for another 5โ€“10 minutes so the flavors combine.


    Step 4: Add Cheese

    • Sprinkle Monterey Jack and cheddar cheese over the top.
    • Cover the skillet.
    • Cook until cheese melts and becomes creamy.

    Step 5: Finish & Serve

    Top with:

    • Fresh cilantro
    • Lime juice
    • Extra green chile

    Serve hot!


    Serving Ideas ๐ŸŒฎ

    Perfect with:

    ๐ŸŒฎ Flour tortillas
    ๐ŸŒฏ Breakfast burritos
    ๐Ÿณ Fried eggs
    ๐Ÿš Mexican rice
    ๐Ÿซ˜ Pinto beans
    ๐Ÿฅ‘ Avocado
    ๐Ÿž Green chile cheese bread
    ๐ŸŒถ๏ธ Salsa verde


    Extra Recipe Tips & Secrets ๐ŸŒถ๏ธโœจ

    For the Best Double Hatch Green Chile & Sausage:

    โœ… Use two types of sausage
    The combination of breakfast sausage and smoked sausage creates deeper flavor.

    โœ… Roast the Hatch chiles
    Roasting brings out their smoky, sweet flavor.

    โœ… Make it extra cheesy
    Add cheese at the end and let it melt slowly.

    โœ… Cook low and slow
    The flavors blend beautifully when simmered.


    Delicious Variations

    ๐Ÿฅ” Green Chile Sausage Potato Skillet:

    Add:

    • Diced crispy potatoes
    • Extra cheese
    • Eggs on top

    ๐ŸŒฏ Loaded Breakfast Burrito:

    Fill tortillas with:

    • Sausage mixture
    • Eggs
    • Cheese
    • Hash browns

    ๐ŸŒถ๏ธ Spicy Version:

    Add:

    • Serrano peppers
    • Hot Hatch chiles
    • Chipotle peppers

    ๐Ÿซ˜ Sausage & Bean Chile Bowl:

    Add:

    • Pinto beans
    • Black beans
    • Extra broth for a stew-style meal

    Storage & Meal Prep

    Refrigerator:
    Store leftovers for up to 4 days.

    Freezer:
    Freeze for up to 3 months.

    Reheating:
    Warm in a skillet or microwave until heated through.


    Social Media Caption Ideas โค๏ธ

    Option 1:

    “Made this Double Hatch Green Chile & Double Sausage and WOW! ๐ŸŒถ๏ธ๐ŸŒญ Packed with smoky Hatch chiles, two kinds of sausage, onions, garlic, and melted cheese. The perfect Southwest comfort meal that everyone loves!
    Full recipe is in the comments below!”


    Option 2:

    “Two sausages, double green chile, and ALL the flavor! ๐Ÿ˜๐ŸŒถ๏ธ This Hatch Green Chile Sausage skillet is cheesy, hearty, and perfect for breakfast, lunch, or dinner.
    Save this recipe because youโ€™re going to want to make it again! โค๏ธ
    Recipe below!”


    Option 3:

    “Green chile lovers, this one is for you! ๐Ÿ”ฅ๐ŸŒถ๏ธ Double Hatch Green Chile and Double Sausage is loaded with bold flavors and cheesy goodness. Serve it in tortillas or enjoy it straight from the skillet โ€” either way, itโ€™s delicious!
    Who would try this? ๐Ÿ‘‡
    Full recipe in the comments!”


    Nutrition Facts (Approximate)

    Per serving (if divided into 8 servings):

    • Calories: 500โ€“650 kcal
    • Protein: 25โ€“35 g
    • Carbohydrates: 8โ€“15 g
    • Fat: 40โ€“50 g
    • Fiber: 2โ€“4 g

    Entire Recipe:

    • Calories: approximately 4,000โ€“5,200 kcal
    • Protein: approximately 200โ€“280 g

    Frequently Asked Questions (Q&A)

    Q: What does โ€œDouble Hatch Green Chileโ€ mean?
    A: It means using an extra generous amount of roasted Hatch green chiles for maximum flavor.

    Q: What sausage works best?
    A: A mix of breakfast sausage and smoked sausage gives the best combination of savory and smoky flavors.

    Q: Can I make this less spicy?
    A: Yes! Use mild Hatch chiles and remove jalapeรฑos.

    Q: Can I add eggs?
    A: Absolutely! Eggs turn this into an amazing breakfast skillet.

    Q: Can I use frozen Hatch green chiles?
    A: Yes, frozen roasted Hatch chiles work very well.

    Q: What can I do with leftovers?
    A: Make burritos, quesadillas, tacos, stuffed peppers, or breakfast bowls.

    Q: Why is Hatch green chile so popular?
    A: Hatch chile has a unique smoky, earthy flavor that pairs perfectly with meat, cheese, and Southwest dishes.


    ๐ŸŒถ๏ธ๐ŸŒญ๐Ÿง€ Double Hatch Green Chile & Double Sausage is a bold, cheesy, flavor-packed recipe that brings together smoky peppers and savory sausage for the ultimate Southwest comfort food! โค๏ธ

  • Green Chile Cheeseburgers

    Green Chile Cheeseburgers

    (New Mexico-Style Hatch Green Chile Cheeseburgers)

    A classic Southwest favorite! These Green Chile Cheeseburgers are made with juicy beef patties, roasted Hatch green chiles, melted cheese, and fresh toppings. The smoky, slightly spicy green chile takes a simple cheeseburger and turns it into an unforgettable meal.


    Ingredients

    For the Burger Patties:

    Makes 6 burgers

    • 2 pounds ground beef (80/20 recommended)
    • 1ยฝ teaspoons salt
    • 1 teaspoon black pepper
    • 1 teaspoon garlic powder
    • 1 teaspoon onion powder
    • 1 tablespoon Worcestershire sauce
    • 1 teaspoon smoked paprika (optional)

    For the Green Chile Topping:

    • 3 cups roasted Hatch green chiles, chopped
    • 1 medium onion, sliced
    • 3 cloves garlic, minced
    • 1 tablespoon butter or olive oil
    • ยฝ teaspoon cumin
    • ยฝ teaspoon salt
    • ยผ teaspoon black pepper

    Cheese & Burger Assembly:

    • 6 hamburger buns
    • 6 slices American cheese
    • 6 slices pepper jack cheese (optional)
    • Lettuce
    • Tomato slices
    • Pickles
    • Red onion slices
    • Mayonnaise
    • Mustard
    • Ketchup

    Instructions

    Step 1: Prepare the Green Chile Topping

    • Heat butter or oil in a skillet.
    • Add sliced onions and cook until softened.
    • Add garlic and cook for 30 seconds.
    • Stir in roasted Hatch green chiles.
    • Season with cumin, salt, and pepper.
    • Simmer for 5โ€“10 minutes.

    Set aside.


    Step 2: Make the Burger Patties

    • Combine ground beef with:
      • Salt
      • Pepper
      • Garlic powder
      • Onion powder
      • Worcestershire sauce
      • Smoked paprika
    • Mix gently (do not overwork the meat).
    • Form into 6 patties slightly larger than your buns.

    Step 3: Cook the Burgers

    Grill Method:

    • Heat grill to medium-high.
    • Cook patties for 4โ€“5 minutes per side.

    Stovetop Method:

    • Heat a cast iron skillet.
    • Cook burgers until browned and cooked to your preference.

    Step 4: Add the Cheese

    • Place cheese slices on burgers during the last minute of cooking.
    • Cover until melted and gooey.

    Step 5: Build the Burger

    Toast buns if desired.

    Layer:

    1. Bottom bun
    2. Burger patty
    3. Melted cheese
    4. Big spoonful of Hatch green chile topping
    5. Lettuce and tomato
    6. Pickles and onions
    7. Sauce
    8. Top bun

    Serve hot!


    Extra Recipe Tips & Secrets ๐ŸŒถ๏ธโœจ

    For the Best Green Chile Cheeseburger:

    โœ… Use 80/20 beef
    The fat creates a juicy, flavorful burger.

    โœ… Roast fresh Hatch chiles
    The smoky flavor makes the burger special.

    โœ… Toast the buns
    It prevents them from getting soggy.

    โœ… Donโ€™t press the burger while cooking
    Youโ€™ll lose the flavorful juices.


    Delicious Variations

    ๐Ÿฅ“ Bacon Green Chile Cheeseburger:

    Add:

    • Crispy bacon
    • Extra cheddar cheese

    ๐ŸŒถ๏ธ Spicy Hatch Burger:

    Add:

    • Serrano peppers
    • Jalapeรฑos
    • Hot green chile sauce

    ๐Ÿณ Breakfast Green Chile Burger:

    Add:

    • Fried egg
    • Bacon
    • Hash browns

    ๐Ÿง€ Ultimate Cheese Burger:

    Use:

    • Pepper Jack
    • Cheddar
    • American cheese

    ๐ŸŒฎ Southwest Burger:

    Add:

    • Avocado
    • Salsa verde
    • Cilantro lime sauce

    Serving Ideas ๐ŸŸ

    Perfect with:

    ๐ŸŸ French fries
    ๐ŸŒฝ Mexican street corn
    ๐Ÿฅ— Fresh salad
    ๐Ÿฅ‘ Guacamole
    ๐ŸŒถ๏ธ Salsa verde
    ๐Ÿง… Onion rings
    ๐Ÿฅค Cold drinks


    Storage & Meal Prep

    Cooked patties:
    Store in the refrigerator for up to 4 days.

    Green chile topping:
    Keeps for up to 5 days refrigerated.

    Freezing:
    Freeze cooked burger patties for up to 3 months.


    Social Media Caption Ideas โค๏ธ

    Option 1:

    “Made these Green Chile Cheeseburgers and they were incredible! ๐ŸŒถ๏ธ๐Ÿ” Juicy beef, melted cheese, and smoky Hatch green chiles come together for the ultimate Southwest burger. Simple, flavorful, and absolutely delicious!
    Full recipe is in the comments below!”


    Option 2:

    “If you love burgers and green chile, this one is for you! ๐Ÿ˜๐ŸŒถ๏ธ๐Ÿ” These Hatch Green Chile Cheeseburgers are loaded with flavor, topped with melted cheese, and finished with the perfect spicy kick.
    Save this recipe โค๏ธ
    Recipe below!”


    Option 3:

    “Burger night just got better! ๐Ÿ”ฅ๐Ÿ” This Green Chile Cheeseburger is packed with juicy beef, gooey cheese, and smoky roasted chiles. A New Mexico classic that everyone needs to try!
    Who would you share this with? ๐Ÿ‘‡
    Full recipe in the comments!”


    Option 4:

    “Nothing beats a homemade burger! ๐ŸŒถ๏ธ๐Ÿง€๐Ÿ” This Green Chile Cheeseburger is cheesy, juicy, smoky, and full of Southwest flavor. Perfect for BBQs, family dinners, or weekend cravings.
    Check the comments for the full recipe!”


    Nutrition Facts (Approximate)

    Per burger:

    • Calories: 650โ€“850 kcal
    • Protein: 35โ€“45 g
    • Carbohydrates: 35โ€“45 g
    • Fat: 40โ€“55 g
    • Fiber: 3โ€“5 g

    Burger patty only:

    • Calories: 350โ€“450 kcal
    • Protein: 30โ€“35 g

    Frequently Asked Questions (Q&A)

    Q: What makes a Green Chile Cheeseburger special?
    A: The roasted Hatch green chile adds smoky flavor, mild heat, and a unique Southwest taste.

    Q: What kind of green chile should I use?
    A: Hatch green chiles are traditional, but Anaheim or poblano peppers can also work.

    Q: Can I make this with ground turkey?
    A: Yes! Add extra seasoning and a little olive oil to keep it juicy.

    Q: How spicy are Hatch green chiles?
    A: They range from mild to hot depending on the variety.

    Q: Can I prepare the green chile topping ahead?
    A: Yes! It actually tastes even better after the flavors blend overnight.

    Q: What cheese works best?
    A: American, cheddar, Monterey Jack, and pepper jack all melt beautifully.

    Q: Can I cook these burgers indoors?
    A: Absolutely! A cast iron skillet gives excellent flavor and a nice crust.


    ๐ŸŒถ๏ธ๐Ÿ”๐Ÿง€ Green Chile Cheeseburgers are the perfect blend of smoky roasted peppers, juicy beef, and melted cheese โ€” a Southwest classic that turns an ordinary burger into something unforgettable! โค๏ธ

  • Tortillas de Harina

    Tortillas de Harina

    (Soft, Warm & Authentic Mexican Flour Tortillas)

    Nothing beats homemade Tortillas de Harina! These soft, fluffy flour tortillas are made with simple ingredients and are perfect for tacos, burritos, quesadillas, breakfast wraps, or simply served warm with butter. Once you try homemade tortillas, youโ€™ll never want store-bought again!


    Ingredients

    Makes about 12โ€“16 flour tortillas

    • 4 cups all-purpose flour
    • 2 teaspoons baking powder
    • 1ยฝ teaspoons salt
    • โ…“ cup vegetable shortening, lard, or butter
    • 1ยฝ cups warm water (add more if needed)

    Instructions

    Step 1: Mix the Dry Ingredients

    In a large bowl combine:

    • Flour
    • Baking powder
    • Salt

    Mix well.


    Step 2: Add the Fat

    • Add shortening, lard, or butter.
    • Use your hands to mix until the flour looks crumbly and the fat is evenly distributed.

    โœ… This step creates soft, tender tortillas.


    Step 3: Add Warm Water

    • Slowly add warm water while mixing.
    • Continue mixing until a soft dough forms.

    The dough should be:

    • Smooth
    • Soft
    • Slightly tacky but not sticky

    Step 4: Knead the Dough

    • Place dough on a lightly floured surface.
    • Knead for 5โ€“8 minutes until smooth and elastic.

    Step 5: Rest the Dough

    • Divide dough into 12โ€“16 balls.
    • Cover with a clean towel or plastic wrap.
    • Let rest for 30โ€“60 minutes.

    โœ… Resting helps the tortillas roll out easily.


    Step 6: Roll the Tortillas

    • Lightly flour your surface.
    • Roll each dough ball into a thin circle, about 7โ€“8 inches wide.

    Try to keep them evenly thin.


    Step 7: Cook the Tortillas

    • Heat a dry skillet or comal over medium-high heat.
    • Place tortilla on the hot surface.
    • Cook for about 30โ€“45 seconds until bubbles appear.
    • Flip and cook another 20โ€“30 seconds.

    You should see light golden spots.


    Step 8: Keep Them Soft

    • Place cooked tortillas in a clean kitchen towel.
    • Keep covered so they stay warm and flexible.

    Extra Tips & Secrets ๐ŸŒฎโœจ

    For Perfect Flour Tortillas:

    โœ… Use warm water
    It helps create a softer dough.

    โœ… Donโ€™t skip resting
    Resting makes rolling much easier.

    โœ… Use lard for traditional flavor
    It creates the softest, most authentic texture.

    โœ… Donโ€™t overcook
    Too much heat makes tortillas dry and stiff.


    Delicious Variations

    ๐Ÿง€ Cheese Flour Tortillas:

    Add:

    • ยฝ cup shredded cheese
    • Green chiles

    ๐ŸŒถ๏ธ Green Chile Tortillas:

    Add:

    • ยผ cup finely chopped Hatch green chiles

    ๐ŸŒฝ Whole Wheat Tortillas:

    Replace:

    • Half the flour with whole wheat flour

    ๐Ÿง„ Garlic Herb Tortillas:

    Add:

    • Garlic powder
    • Cilantro
    • Herbs

    ๐Ÿฅ“ Breakfast Tortilla:

    Fill with:

    • Eggs
    • Bacon
    • Cheese
    • Salsa

    Serving Ideas ๐ŸŒฎ

    Perfect for:

    ๐ŸŒฏ Burritos
    ๐ŸŒฎ Street tacos
    ๐Ÿง€ Quesadillas
    ๐Ÿณ Breakfast tacos
    ๐Ÿฅฉ Carne asada
    ๐Ÿ— Chicken fajitas
    ๐ŸŒถ๏ธ Green chile dishes
    ๐Ÿซ˜ Beans and rice


    Storage

    Room Temperature:
    Keep wrapped for 1โ€“2 days.

    Refrigerator:
    Store in an airtight bag for up to 1 week.

    Freezer:
    Freeze with parchment between tortillas for up to 3 months.


    Social Media Caption Ideas โค๏ธ

    Option 1:

    “Made homemade Tortillas de Harina today and they turned out perfect! ๐ŸŒฎโœจ Soft, warm, and fluffy tortillas made from scratch with simple ingredients. Theyโ€™re so much better homemade!
    Full recipe is in the comments below!”


    Option 2:

    “Nothing compares to fresh homemade flour tortillas! ๐Ÿ˜๐ŸŒฎ Warm, soft, and perfect for tacos, burritos, or just eating with butter. This recipe is a must-have for every kitchen.
    Save this recipe โค๏ธ
    Recipe below!”


    Option 3:

    “Fresh tortillas straight from the comal! ๐ŸŒฎ๐Ÿ”ฅ These homemade Tortillas de Harina are soft, delicious, and full of authentic flavor. Once you make them from scratch, youโ€™ll never look back!
    Who loves homemade tortillas? ๐Ÿ‘‡
    Full recipe in the comments!”


    Nutrition Facts (Approximate)

    Per tortilla (if recipe makes 16):

    • Calories: 140โ€“180 kcal
    • Protein: 3โ€“5 g
    • Carbohydrates: 22โ€“28 g
    • Fat: 4โ€“7 g
    • Fiber: 1 g

    Entire Recipe:

    • Calories: approximately 2,300โ€“2,800 kcal
    • Protein: approximately 60โ€“80 g

    Frequently Asked Questions (Q&A)

    Q: Why are my tortillas tough?
    A: They may have been overcooked, not rested long enough, or rolled too thick.

    Q: Can I use butter instead of lard?
    A: Yes! Butter gives a delicious flavor, while lard creates a more traditional texture.

    Q: How thin should flour tortillas be?
    A: They should be thin enough to see slight light through but still strong enough to hold fillings.

    Q: Can I make the dough ahead of time?
    A: Yes! Keep the dough covered in the refrigerator for up to 2 days.

    Q: Why do my tortillas not puff?
    A: Make sure the skillet is hot and the dough is rolled evenly.

    Q: Can I freeze homemade tortillas?
    A: Yes! Freeze them with parchment paper between each tortilla.


    ๐ŸŒฎโค๏ธ Homemade Tortillas de Harina are soft, warm, and made with love. Perfect for tacos, burritos, quesadillas, or enjoying fresh off the pan with a little butter โ€” a true homemade Mexican favorite!

  • Chiles Rellenos Cornbread

    (Cheesy Green Chile Stuffed Cornbread)

    This Chiles Rellenos Cornbread combines the flavors of a classic Mexican chile relleno with a soft, buttery cornbread. Made with roasted poblano peppers, melted cheese, and sweet corn, this dish is the perfect side for chili, soups, BBQ, tacos, or a comforting family dinner.


    Ingredients

    For the Cornbread:

    • 2 cups cornmeal
    • 1 cup all-purpose flour
    • 1 tablespoon baking powder
    • 1 teaspoon salt
    • 2 tablespoons sugar (optional)
    • 2 large eggs
    • 1ยฝ cups buttermilk
    • ยฝ cup melted butter
    • ยฝ cup sour cream
    • 1 cup corn kernels (fresh, frozen, or canned)

    Chile Rellenos Filling:

    • 4โ€“5 roasted poblano peppers, peeled and seeded
    • 2 cups shredded Monterey Jack cheese
    • 1 cup shredded cheddar cheese
    • ยฝ cup queso fresco (optional)
    • 1โ€“2 jalapeรฑos, finely chopped (optional)
    • ยฝ cup roasted Hatch green chiles

    Optional Toppings:

    • Extra shredded cheese
    • Fresh cilantro
    • Sliced jalapeรฑos
    • Sour cream
    • Salsa verde
    • Green onions

    Instructions

    Step 1: Roast the Peppers

    • Roast poblano peppers over an open flame, grill, or under the broiler until the skin is blistered.
    • Place peppers in a covered bowl for 10โ€“15 minutes to steam.
    • Peel the skin and remove seeds.
    • Slice into strips.

    Step 2: Prepare the Cornbread Batter

    In a large bowl combine:

    • Cornmeal
    • Flour
    • Baking powder
    • Salt
    • Sugar

    In another bowl mix:

    • Eggs
    • Buttermilk
    • Melted butter
    • Sour cream

    Combine wet and dry ingredients.

    Fold in:

    • Corn kernels
    • Hatch green chiles

    Step 3: Assemble the Cornbread

    • Preheat oven to 375ยฐF (190ยฐC).
    • Grease a 9×13 baking dish or cast iron skillet.
    • Pour half of the cornbread batter into the pan.
    • Add roasted poblano strips.
    • Sprinkle cheese evenly over peppers.
    • Add remaining batter on top.
    • Sprinkle extra cheese if desired.

    Step 4: Bake

    • Bake for 35โ€“45 minutes until golden brown.
    • A toothpick inserted in the center should come out clean.
    • Let cool for 10 minutes before slicing.

    Step 5: Serve

    Serve warm with:

    • Salsa verde
    • Sour cream
    • Chili
    • Green chile stew
    • Pinto beans
    • BBQ meats

    Extra Recipe Tips & Secrets ๐ŸŒถ๏ธโœจ

    For the Best Chiles Rellenos Cornbread:

    โœ… Roast the peppers first
    This creates the smoky flavor that makes the dish special.

    โœ… Use a cast iron skillet
    It gives the edges a delicious golden crust.

    โœ… Donโ€™t overmix the batter
    Mix just until combined for a soft texture.

    โœ… Use good melting cheese
    Oaxaca, Monterey Jack, and Pepper Jack work beautifully.


    Delicious Variations

    ๐Ÿฅ“ Bacon Green Chile Cornbread:

    Add:

    • Crispy bacon pieces
    • Extra cheddar cheese

    ๐ŸŒฝ Mexican Street Corn Style:

    Add:

    • Cotija cheese
    • Lime zest
    • Tajรญn seasoning
    • Cilantro

    ๐Ÿ— Chicken Chiles Rellenos Cornbread:

    Add:

    • Shredded chicken
    • Extra green chile sauce

    ๐Ÿ”ฅ Spicy Version:

    Add:

    • Serrano peppers
    • Hot Hatch chiles
    • Chipotle peppers

    Serving Ideas ๐ŸŒฎ

    Perfect with:

    ๐Ÿฒ Green Chile Pork Posole
    ๐Ÿซ˜ Pinto Beans
    ๐Ÿฅฉ Carne Guisada
    ๐Ÿ— Green Chile Chicken Stew
    ๐ŸŒถ๏ธ Salsa Verde
    ๐Ÿ– Smoked brisket
    ๐Ÿฅ— Fresh salad


    Storage & Meal Prep

    Refrigerator:
    Store covered for up to 4 days.

    Freezer:
    Freeze individual slices for up to 3 months.

    Reheating:
    Warm in the oven or air fryer to bring back the crispy edges.


    Social Media Caption Ideas โค๏ธ

    Option 1:

    “Made this Chiles Rellenos Cornbread and it was incredible! ๐ŸŒถ๏ธ๐ŸŒฝ๐Ÿง€ A fluffy homemade cornbread loaded with roasted poblano peppers, Hatch green chiles, and melted cheese. The perfect combination of Mexican flavors and classic comfort food!
    Full recipe is in the comments below!”


    Option 2:

    “If you love chile rellenos, you need to try this cornbread! ๐Ÿ˜๐ŸŒถ๏ธ Cheesy, buttery, slightly spicy, and packed with roasted pepper flavor. This is the side dish everyone will ask for again and again.
    Save this recipe โค๏ธ
    Recipe below!”


    Option 3:

    “This Chiles Rellenos Cornbread disappeared fast! ๐ŸŒฝ๐Ÿ”ฅ The smoky roasted peppers, creamy melted cheese, and sweet cornbread come together perfectly. A must-have for taco nights, BBQs, and family dinners.
    Who would try a slice? ๐Ÿ‘‡
    Full recipe in the comments!”


    Option 4:

    “Comfort food with a Southwest twist! ๐ŸŒถ๏ธ๐Ÿง€ This Chiles Rellenos Cornbread is warm, cheesy, and full of bold flavor. Perfect with soups, chili, or enjoyed all on its own.
    Check the comments for the full recipe!”


    Nutrition Facts (Approximate)

    Per slice (if cut into 12 pieces):

    • Calories: 280โ€“380 kcal
    • Protein: 10โ€“15 g
    • Carbohydrates: 30โ€“40 g
    • Fat: 15โ€“22 g
    • Fiber: 2โ€“4 g

    Entire Recipe:

    • Calories: approximately 3,500โ€“4,500 kcal
    • Protein: approximately 130โ€“180 g

    Frequently Asked Questions (Q&A)

    Q: What peppers are best for this cornbread?
    A: Poblano peppers are traditional because they have a mild flavor and roast beautifully.

    Q: Can I use canned green chiles?
    A: Yes! They are a great shortcut and still add delicious flavor.

    Q: Can I make this less spicy?
    A: Yes. Remove seeds from peppers and use mild Hatch chiles.

    Q: Can I make this ahead of time?
    A: Absolutely! Bake it ahead and reheat before serving.

    Q: What cheese works best?
    A: Monterey Jack, Oaxaca, Pepper Jack, and cheddar all melt well.

    Q: Can I add meat?
    A: Yes! Shredded chicken, bacon, or ground beef make great additions.

    Q: What makes this recipe special?
    A: It combines the smoky, cheesy flavors of chile rellenos with the comforting texture of homemade cornbread.


    ๐ŸŒถ๏ธ๐ŸŒฝ๐Ÿง€ Chiles Rellenos Cornbread is the perfect fusion of Mexican flavors and Southern comfort food โ€” cheesy, buttery, slightly spicy, and packed with roasted chile goodness in every bite! โค๏ธ

  • Slow Cooker Pinto Beans, Green Chile & Beef

    (Slow-Cooked Southwestern Beef and Bean Stew)

    This Slow Cooker Pinto Beans, Green Chile & Beef recipe is the perfect comfort meal! Tender beef, creamy pinto beans, and smoky Hatch green chiles slowly cook together with bold spices to create a hearty Southwestern dish. Itโ€™s delicious served as a stew, taco filling, burrito filling, or with warm tortillas.


    Ingredients

    For the Slow Cooker:

    • 2 pounds beef chuck roast or stew meat, cut into chunks
    • 2 cups dried pinto beans (or 4 cans cooked pinto beans, drained and rinsed)
    • 3 cups roasted Hatch green chiles, chopped
    • 1 large onion, diced
    • 6 cloves garlic, minced
    • 2 jalapeรฑos, sliced (optional)
    • 1 can (14.5 oz) diced tomatoes
    • 6 cups beef broth
    • 2 tablespoons tomato paste

    Seasonings:

    • 2 tablespoons chili powder
    • 2 teaspoons ground cumin
    • 2 teaspoons Mexican oregano
    • 1 teaspoon smoked paprika
    • 1 teaspoon garlic powder
    • 1 teaspoon onion powder
    • 1 teaspoon salt (adjust to taste)
    • 1 teaspoon black pepper
    • ยฝ teaspoon cayenne pepper (optional)

    Optional Additions:

    • 6 slices cooked bacon, chopped
    • 1 smoked ham hock
    • 1 cup corn kernels
    • 1 bell pepper, diced
    • 1 cup shredded Monterey Jack cheese
    • Fresh cilantro
    • Lime juice

    Instructions

    Step 1: Prepare the Beef

    • Season beef chunks with salt and pepper.
    • Heat a skillet with a little oil.
    • Sear beef on all sides until browned.

    โœ… Browning adds a deeper, richer flavor, but you can skip this step if needed.


    Step 2: Add Ingredients to Slow Cooker

    Place into the slow cooker:

    • Beef
    • Pinto beans
    • Green chiles
    • Onion
    • Garlic
    • Tomatoes
    • Tomato paste
    • Jalapeรฑos
    • Beef broth
    • All seasonings

    Stir everything together.


    Step 3: Slow Cook

    For dried beans:

    • Cook on LOW for 8โ€“10 hours
      or
    • HIGH for 5โ€“6 hours

    until beans are tender and beef falls apart.

    For canned beans:

    • Cook on LOW for 6โ€“7 hours
    • Add beans during the last 1โ€“2 hours for the best texture.

    Step 4: Finish the Dish

    • Shred the beef slightly with a fork.
    • Stir everything together.
    • Add lime juice and fresh cilantro.
    • Adjust salt and spice.

    Serve hot!


    Serving Ideas ๐ŸŒฎ

    Enjoy with:

    ๐ŸŒฝ Warm cornbread
    ๐ŸŒฎ Flour tortillas
    ๐Ÿš Mexican rice
    ๐Ÿฅ‘ Avocado slices
    ๐Ÿง€ Shredded cheese
    ๐ŸŒถ๏ธ Salsa verde
    ๐Ÿณ Fried eggs on top
    ๐Ÿฅ— Fresh salad


    Extra Recipe Tips & Secrets ๐ŸŒถ๏ธโœจ

    For the Best Flavor:

    โœ… Use chuck roast
    It becomes incredibly tender after slow cooking.

    โœ… Roast your green chiles
    Roasted Hatch chiles add a smoky Southwest flavor.

    โœ… Mash some beans
    Mash 1 cup of beans into the broth for a thicker, creamier texture.

    โœ… Make it the next day
    The flavors become even richer after resting overnight.


    Delicious Variations

    ๐Ÿฅ“ Bacon Green Chile Beef Beans:

    Add:

    • Crispy bacon
    • Smoked paprika
    • Extra onions

    ๐ŸŒถ๏ธ Spicy Version:

    Add:

    • Serrano peppers
    • Hot Hatch chiles
    • Chipotle peppers

    ๐Ÿง€ Creamy Green Chile Beef:

    Add at the end:

    • Cream cheese
    • Monterey Jack cheese
    • Sour cream

    ๐ŸŒฎ Taco Bowl Version:

    Serve over:

    • Rice
    • Lettuce
    • Cheese
    • Salsa
    • Avocado

    Storage & Meal Prep

    Refrigerator:
    Store in an airtight container for up to 5 days.

    Freezer:
    Freeze for up to 3 months.

    Reheating:
    Warm slowly and add a little broth if it becomes too thick.


    Social Media Caption Ideas โค๏ธ

    Option 1:

    “Made this Slow Cooker Pinto Beans, Green Chile & Beef and it was pure comfort food! ๐ŸŒถ๏ธ๐Ÿฅฉ๐Ÿซ˜ Tender beef, creamy beans, and smoky green chiles slow cooked together for the perfect hearty meal.
    This recipe is packed with flavor and perfect for family dinners!
    Full recipe is in the comments below!”


    Option 2:

    “Dinner was a success with this Slow Cooker Green Chile Beef & Pinto Beans! ๐Ÿ˜๐ŸŒถ๏ธ The beef is fall-apart tender, the beans are creamy, and the Hatch green chile adds the perfect kick. A warm bowl of homemade goodness!
    Save this recipe โค๏ธ
    Recipe below!”


    Option 3:

    “Nothing beats a slow cooker meal! ๐Ÿฅฉ๐Ÿซ˜ This Pinto Bean, Green Chile & Beef recipe is loaded with bold Southwest flavors and makes the house smell amazing all day long. Perfect with tortillas, rice, or your favorite toppings.
    Who would love a bowl of this? ๐Ÿ‘‡
    Full recipe in the comments!”


    Option 4:

    “Comfort food at its best! ๐ŸŒถ๏ธ๐Ÿฒ Slow cooked beef, hearty pinto beans, and roasted green chiles come together in this delicious homemade recipe. Easy, flavorful, and perfect for sharing.
    Check the comments for the full recipe!”


    Nutrition Facts (Approximate)

    Per serving (if divided into 8 servings):

    • Calories: 450โ€“600 kcal
    • Protein: 35โ€“45 g
    • Carbohydrates: 45โ€“60 g
    • Fat: 15โ€“25 g
    • Fiber: 12โ€“16 g

    Entire Recipe:

    • Calories: approximately 3,600โ€“4,800 kcal
    • Protein: approximately 280โ€“350 g

    Frequently Asked Questions (Q&A)

    Q: Can I use canned pinto beans?
    A: Yes! Add them near the end of cooking so they donโ€™t become too soft.

    Q: What beef is best for this recipe?
    A: Chuck roast is ideal because it becomes tender and flavorful after slow cooking.

    Q: Can I make this recipe spicy?
    A: Yes! Add extra Hatch chiles, serranos, or hot sauce.

    Q: Can I make this without beef?
    A: Absolutely. Use extra beans, mushrooms, or shredded chicken instead.

    Q: Can I cook this on the stovetop?
    A: Yes! Simmer covered for 2โ€“3 hours until the beef and beans are tender.

    Q: What are Hatch green chiles?
    A: Hatch chiles are New Mexico peppers known for their smoky flavor and delicious roasted taste.

    Q: What can I do with leftovers?
    A: Use them for tacos, burritos, nachos, enchiladas, or chili bowls.


    ๐ŸŒถ๏ธ๐Ÿฅฉ๐Ÿซ˜ Slow Cooker Pinto Beans, Green Chile & Beef is the ultimate Southwest comfort meal โ€” tender beef, creamy beans, and smoky green chile flavors cooked low and slow for a bowl full of homemade goodness! โค๏ธ