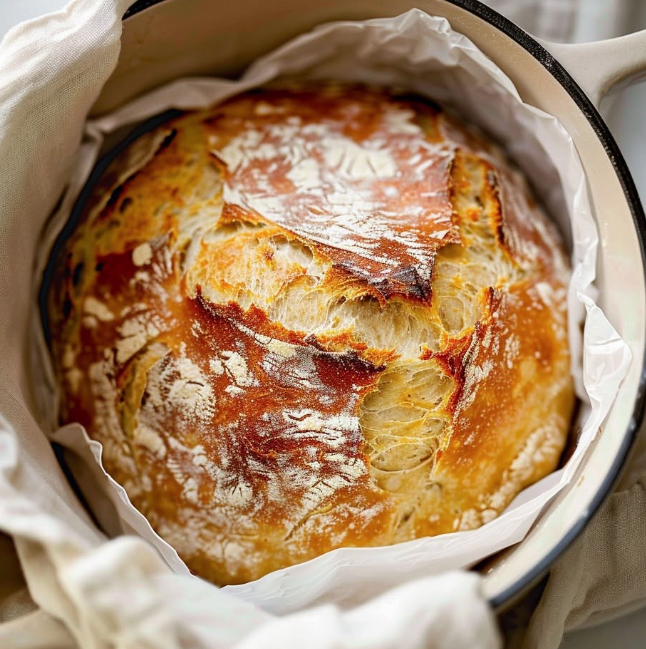
(Crispy Golden Crust, Soft Airy Center & Rustic Bakery-Style Flavor)
This Homemade Artisan Bread gives you that beautiful bakery-style loaf with a deeply golden, crackly crust and a soft, chewy interior filled with irregular air pockets. 🥖❤️ The best part? You only need a handful of simple ingredients and no complicated kneading.
A long, slow rise develops the flavor, while baking in a hot Dutch oven traps steam and creates that gorgeous rustic crust.
Full Recipe (Ingredients + Instructions)
Ingredients – Makes 1 Large Loaf
- 3½ cups (455 g) bread flour
- 1½ teaspoons (9 g) fine sea salt
- ½ teaspoon instant or active dry yeast
- 1½ cups (355 ml) lukewarm water
- 1 teaspoon honey or sugar, optional
- 1 tablespoon olive oil, optional
- Extra flour for dusting
- Rice flour for the proofing basket, optional
Step 1: Mix the Dough 🌾
In a large bowl, combine the bread flour, salt, and yeast.
Add the lukewarm water and optional honey.
Mix with a wooden spoon or your hands until no large patches of dry flour remain.
The dough should look rough, sticky, and shaggy.
That’s exactly what you want!
Don’t keep adding flour just because the dough feels sticky.
Step 2: Let the Dough Rest
Cover the bowl and let the dough rest for 30 minutes.
This simple rest allows the flour to absorb the water and begins developing the dough structure without heavy kneading.
Step 3: Stretch & Fold 🤲
Wet your hand lightly.
Grab one side of the dough, gently stretch it upward, and fold it over the center.
Turn the bowl and repeat.
Make approximately 4 folds around the dough.
Cover and rest for 30 minutes.
Repeat this process 2–3 more times at 30-minute intervals.
You’ll notice the messy dough gradually becoming smoother, stronger, and more elastic.
Step 4: Long Fermentation ⏰
After the final fold, cover the bowl.
You now have two options.
For same-day bread, let the dough rise at room temperature for approximately 1½–3 hours, depending on room temperature, until noticeably expanded and airy.
For Better Artisan Flavor ❤️
After the dough begins fermenting, cover and refrigerate it for 12–24 hours.
The cold fermentation develops deeper flavor and makes this simple bread taste much more like a bakery loaf.
Step 5: Shape the Loaf 🥖
Lightly flour your work surface.
Turn out the dough carefully so you don’t completely knock out all the beautiful gas bubbles.
Gently stretch the dough into a rough rectangle.
Fold the edges toward the center.
Turn it seam-side down.
Using your hands or a bench scraper, gently pull the loaf toward yourself while rotating it.
This creates surface tension and forms a tight round boule.
Step 6: Final Proof
Place the loaf seam-side up in a well-floured banneton or a bowl lined with a heavily floured kitchen towel.
Rice flour is particularly useful because it helps prevent sticking.
Cover and proof for approximately 45–75 minutes at room temperature.
If you’re working with cold-fermented dough, you can also shape it and return it to the refrigerator for a longer cold final proof.
Step 7: Preheat the Dutch Oven 🔥
Place a Dutch oven with its lid inside your oven.
Preheat to:
475°F (245°C)
Allow the Dutch oven to heat for at least 30–45 minutes.
A properly preheated pot is one of the secrets to that gorgeous artisan crust.
Step 8: Score the Bread ✂️
Carefully turn the dough onto parchment paper.
Dust lightly with flour if desired.
Using a very sharp knife, razor, or bread lame, make one confident slash approximately ½ inch deep across the top.
You can also make a cross or decorative wheat pattern.
Scoring gives the expanding dough somewhere to open during baking.
Step 9: Bake Covered 🥖🔥
Carefully lower the dough into the HOT Dutch oven.
Cover immediately.
Reduce the oven temperature to:
450°F (230°C)
Bake covered for 25 minutes.
The covered Dutch oven traps moisture released by the dough, creating steam around the loaf.
That’s what helps create dramatic oven spring and a thin, crisp crust.
Step 10: Bake Uncovered
Remove the lid.
Continue baking for another 18–25 minutes, until the loaf is deeply golden brown.
Don’t be afraid of color!
A properly caramelized crust provides a huge amount of the bread’s flavor.
The center should reach approximately 205–210°F (96–99°C).
Step 11: COOL IT! 😄
This might be the hardest step.
Transfer the loaf to a wire rack and let it cool for at least 1 hour, preferably a little longer, before slicing.
Cutting immediately releases steam and can leave the crumb gummy.
Listen closely while it cools—you may actually hear that crispy crust crackling. 🥖❤️
Extra-Crusty Artisan Bread Secret 🔥
Once the bread is finished, turn off the oven.
Crack the oven door slightly and leave the loaf inside for another 5–10 minutes.
This helps dry the exterior for an even crunchier crust.
Garlic Herb Artisan Bread 🧄🌿
Add to the dough:
- 3 minced garlic cloves
- 1 tablespoon chopped rosemary
- 1 teaspoon thyme
- ½ teaspoon cracked black pepper
Finish with flaky sea salt before baking.
Your kitchen will smell incredible. 🧄🥖
Jalapeño Cheddar Artisan Bread 🌶️🧀
During the final stretch-and-fold, gently incorporate:
- 1½ cups shredded sharp cheddar
- 1–2 diced jalapeños
- ¼ cup roasted Hatch/New Mexico green chile, well drained
Sprinkle a little additional cheddar over the top before baking.
Cheese pockets + green chile + crispy bread = TROUBLE. 😂🔥
Rosemary Parmesan Artisan Bread 🌿🧀
Add:
- ¾ cup grated Parmesan
- 1½ tablespoons fresh rosemary
- ½ teaspoon garlic powder
- Freshly cracked pepper
Sprinkle additional Parmesan over the loaf before baking.
This one is perfect with soup.
Olive Artisan Bread 🫒
Fold in:
- 1 cup drained and chopped Kalamata or green olives
- 1 teaspoon dried oregano
- ½ teaspoon cracked pepper
Make sure the olives are well drained so they don’t introduce excessive moisture.
Extra Recipe Tips & Variations ✨
Use bread flour for a chewier crumb and stronger dough structure. All-purpose flour can work, but you may need to adjust the water slightly.
Don’t drown sticky dough in additional flour. Moderately wet dough helps produce those beautiful irregular holes.
Use a kitchen scale whenever possible. Bread is much more consistent when ingredients are measured by weight.
Cold fermentation is one of the easiest ways to improve flavor.
And preheat that Dutch oven properly—it matters!
Flavor Upgrades / Secret Tips 🔥
🥖 Use a 12–24 hour cold fermentation for deeper flavor.
💧 Don’t be scared of somewhat sticky dough.
🌾 Replace 50 g of the bread flour with whole wheat flour for a nuttier flavor.
🍯 A teaspoon of honey adds subtle sweetness and encourages browning.
🔥 Bake until the crust is properly dark golden, not pale.
🧂 Sprinkle flaky sea salt over savory variations.
✂️ Score quickly and confidently with a very sharp blade.
❤️ And ALWAYS allow the loaf to cool before slicing.
No Dutch Oven? No Problem!
Place a baking stone, steel, or heavy baking sheet in the oven while it preheats.
Place another sturdy metal pan on a lower rack.
Transfer the loaf onto the hot baking surface.
Immediately pour about 1 cup boiling water into the lower hot pan and close the oven.
Bake at 450°F (230°C).
Remove or stop adding steam after approximately 15–20 minutes and continue baking until deeply golden.
Be careful—the steam is extremely hot.
Serving Ideas 🍽️
Serve warm slices with salted butter, olive oil and herbs, homemade soup, beef stew, pasta, roasted chicken, eggs, cheese, or your favorite preserves.
My Favorite ❤️
Cut a thick slice.
Toast it.
Rub the hot surface with a cut garlic clove.
Drizzle with good olive oil.
Add flaky salt.
That’s it. Don’t touch it anymore. 😂🥖
Storage & Meal Prep Tips 🥡
Let the bread cool completely before storing.
For the first day, keep it cut-side down on a cutting board or loosely wrapped to help preserve the crust.
For longer storage, keep it in a bread bag or airtight container, knowing that the crust will soften somewhat.
For best long-term storage, slice the loaf and freeze the individual slices for up to 2–3 months.
Toast directly from frozen whenever you want fresh-tasting bread.
To refresh a whole loaf, lightly dampen the crust and warm it at 350°F (175°C) for 8–12 minutes.
Nutrition Facts 📊
Approximate per slice, based on 12 slices:
- Calories: 145–165 kcal
- Protein: 5–6 g
- Carbohydrates: 29–32 g
- Fat: 1–2 g
- Fiber: 1–2 g
Nutrition varies with flour and optional additions.
Frequently Asked Questions (Q&A)
Why is my artisan bread dough sticky?
That’s normal. A relatively hydrated dough helps create a lighter, more open crumb.
Can I use all-purpose flour?
Yes. Start with slightly less water because some all-purpose flours absorb less than strong bread flour.
Why use a Dutch oven?
It traps steam around the bread during the first part of baking, helping the loaf expand while creating a beautiful crust.
Can I leave the dough overnight?
Yes! Refrigerating it for 12–24 hours is one of the best ways to develop flavor.
Why didn’t my bread have large holes?
Possible reasons include dough that was too dry, insufficient fermentation, weak gluten development, or pressing too much gas out during shaping.
Why is my bread gummy inside?
It may have been underbaked or sliced while still hot.
Can I add cheese or herbs?
Absolutely. Cheddar-jalapeño, rosemary-Parmesan, roasted garlic, olives, and green chile are all fantastic.
Social Media Captions ❤️
Facebook Style:
“Homemade Artisan Bread! 🥖❤️ Look at that crispy golden crust and soft, airy center! Just a few simple ingredients, a little patience and a hot Dutch oven. Nothing beats the smell of fresh bread baking in your own kitchen!”
Short Caption:
“CRISPY outside, soft and airy inside. Homemade Artisan Bread perfection! 🥖🔥❤️”
Cozy Caption:
“Fresh bread in the oven, butter waiting on the counter and the whole house smelling amazing. That’s my kind of day. 🥖🧈❤️”
Engagement Caption:
“Fresh Artisan Bread just came out of the oven! What are you putting on the first warm slice—BUTTER 🧈, CHEESE 🧀, JAM 🍓, or OLIVE OIL 🫒? 👇”
Final Food Description 🥖✨
Homemade Artisan Bread has everything you want in a rustic bakery loaf—a deeply golden, crackling crust surrounding a tender, chewy, airy crumb with beautiful irregular pockets throughout. Slow fermentation develops rich wheaty flavor while Dutch-oven baking creates that irresistible crisp exterior. Simple ingredients, beautiful texture, and the incredible aroma of freshly baked bread make this loaf worth every minute of waiting. 🥖🔥🧈❤️